This topic describes the development process of an MCU connection solution, as a quick start guide for developers. This topic introduces the development process, starts with type selection, and provides the links of all documents required during development. For development tutorials of specific communication protocols, see the development overviews of corresponding solutions.
As one of the most frequently-used solutions to connect to the Tuya IoT Console, the MCU connection solution is mainly used to enable products with MCU to be smart. Tuya provides hardware modules, apps, and cloud services. You only need to focus on product function research and development and develop the smart products efficiently and quickly with Tuya MCU SDK, public version app, and panel.
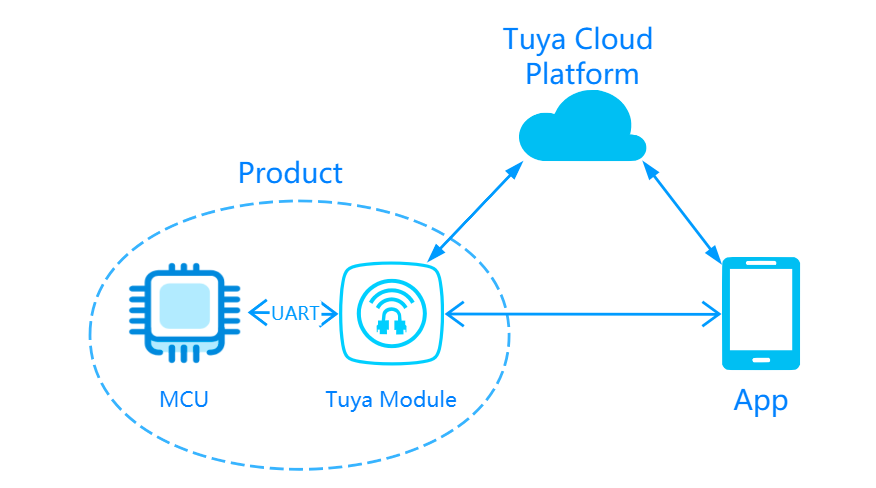
The communication schematic diagram of MCU connection solutions is as follows.
App solution
An app solution often uses a public version app or OEM app. You can download and use the free public version apps from application stores, including the Tuya Smart app and Smart Life app (with a neutral logo). If you want an app of your own brand, Tuya also provides an OEM app service. You can create an OEM app online. For more information, see OEM App Auto Building.
Cloud service solution
Tuya provides global customers with a safe, stable, and fast Tuya cloud service. By connecting to Tuya Cloud through Tuya modules, you can be free from research and development. To connect to the cloud, you can use Tuya Cloud OpenAPI to develop a native app quickly. For more information about the cloud development platform, see Solutions Introduction.
Hardware solution
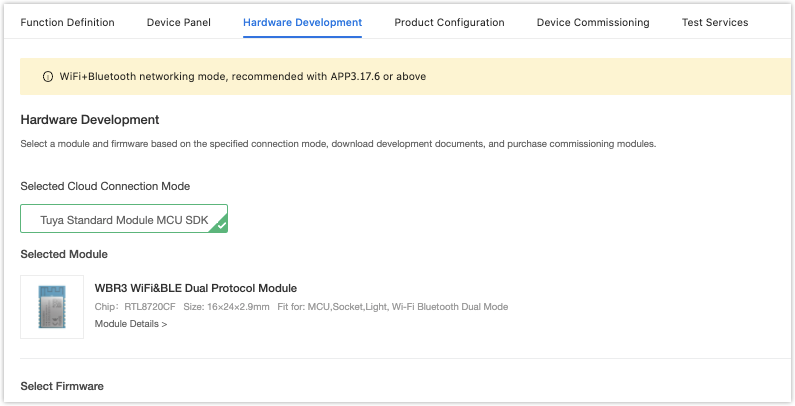
When you select a hardware solution, the main focus is the communication type and the module. A module in which the general firmware is burned is called a general module. At present, Tuya general modules support numerous communication types, including Wi-Fi, BLE, Zigbee, NB-IoT, and GPRS. Before connection, select the communication type of the module according to actual requirements. Specific module types are recommended in the IoT Console after you create a product.
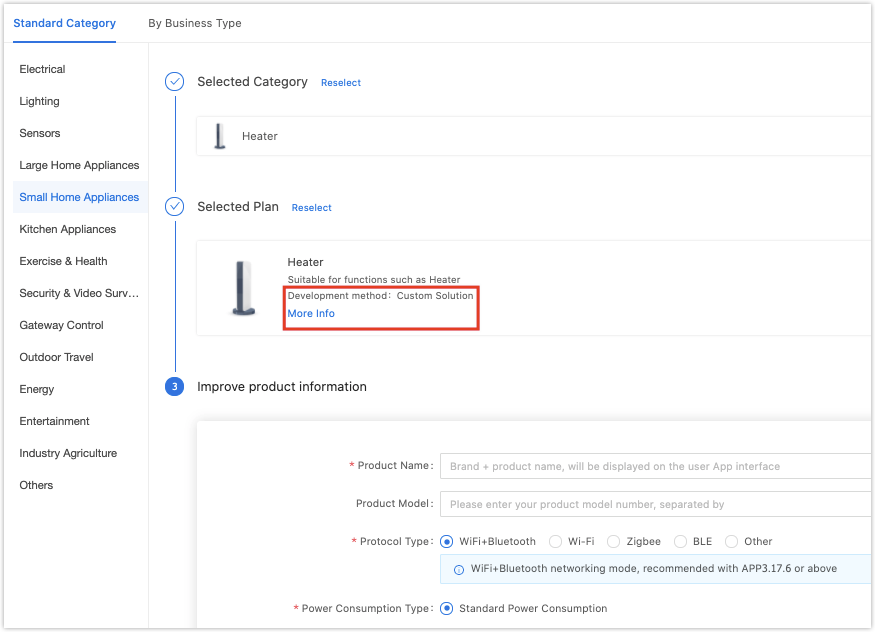
After you select a solution, you need to create a product in Tuya IoT Console and download MCU development documents. Tuya IoT Console is an online one-stop development platform, covering all the steps from product creation to mass production. There are four main steps.
For more information about product creation, see Create Products.
When you create a product, you can choose from the plug-and-play solution and custom solution.
For MCU connection, the products use custom solutions. The communication type determines the protocol and module recommendation.
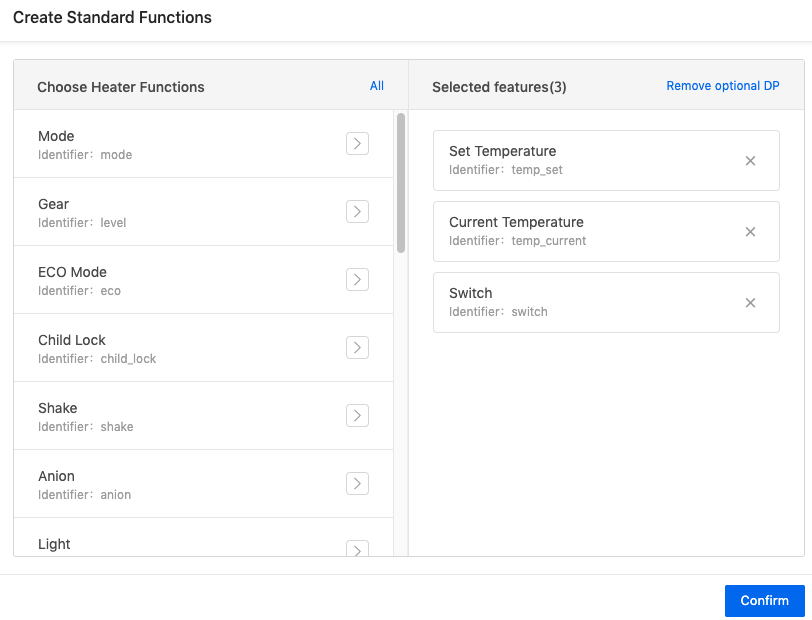
For more information about function selection, see Standard Functions. A data point (DP) is an abstract representation of product functions.
Tuya provides all products with standard DPs. You can select DPs according to your actual requirements.
If standard DPs fail to meet your requirements, you can customize them. For more information about custom functions, see Custom Functions.
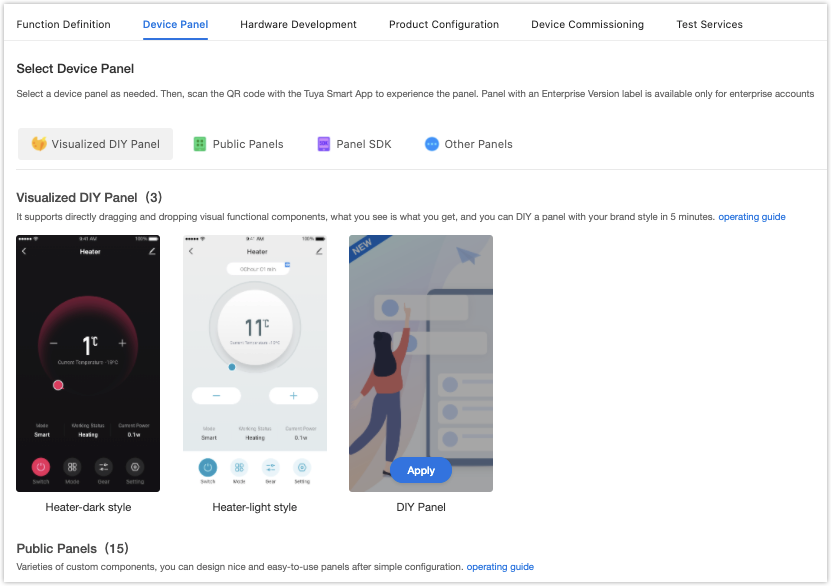
In an app, the control interface of a device is called a panel.
Tuya provides nearly 100 types of free public version panels for you. The public version panels can be customized. For more information about app panel configuration, see Design App UI.
If you want to customize the panel, Tuya provides a custom panel development service.
IoT Console recommends modules to you according to your product and communication solution. You can place an order online, or select another module according to actual requirements. For the module datasheet, see TYWE1S Module Datasheet.
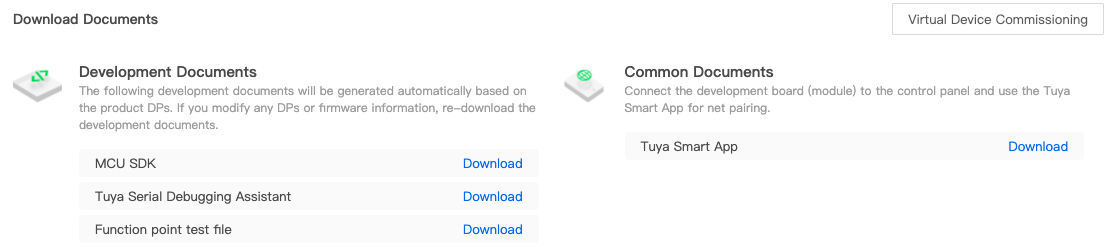
You can download MCU development documents including:
MCU SDK: MCU code based on C language. It is generated automatically according to product functions defined in the IoT Console. The communication and protocol parsing architecture has been completed and can be added to existing MCU projects directly. Therefore, the MCU program development can be completed quickly.
Serial port communication protocol: The serial port communication protocol of Tuya modules, which is generated automatically according to selected functions.
Tuya serial port debugging assistant: It integrates serial port debugging tools for communication protocols of Tuya modules. It is used in the development debugging of MCU general connection solutions.
DP debugging file: It includes product ID (PID), DP, and other information. It is used with the assistant.
After the product is created, you can purchase module samples, download the software development kit (SDK) in the IoT Console, and enter development debugging. Click to view tutorials according to the protocols in the downloaded SDK.
Wi-Fi:
NB-IoT: NB Development Guide
The protocol development guides already provide detailed descriptions. Now, we will introduce the main processes and documents for development debugging.
After you receive the module sample, you can build a minimum system. With a Tuya host, you can configure the network, operate, and get to know the data interaction process of the protocol. For more information, see the following topics:
During software development, if MCU resources are adequate, it is recommended to migrate MCU SDK. After the underlying driver of the serial port works properly, the protocol connection does not need development. Therefore, the software development cycle is shortened substantially.
Different SDKs have different requirements for MCU hardware resources. For example, according to Wi-Fi MCU SDK, the Flash sector size must be 4 KB. RAM size is related to DP data length, and RAM is about 100 bytes.
If the OTA function is configured, RAM must be greater than 260 bytes. The function nesting level is 9 levels. In case of insufficient resources, you can implement connection protocols by yourself, and refer to functions in the SDK.
For more information about the software debugging, see Overview of migrating Tuya’s MCU SDK.
During joint debugging of functions, enter IoT Console > Operation to view background data and make decisions. For more information, see Operations Guide of Operation Center.
Tuya provides an online support service. If documentation fails to solve your question, raise your question online. Our professional technical team will be ready to help you.
For more information about the support center, see Tutorial for Tuya Support Center.