Update Firmware
If a device is integrated with MCU general firmware or IPC SDK, you can update the firmware of the delivered devices on the Tuya IoT Platform online remotely without flashing. The control board shall support firmware updates. This topic describes the update process for devices integrated with MCU general firmware and IPC SDK.
Prerequisites
You have created at least one product. For more information, see Create Products.
Method 1: Update to the released Tuya firmware
-
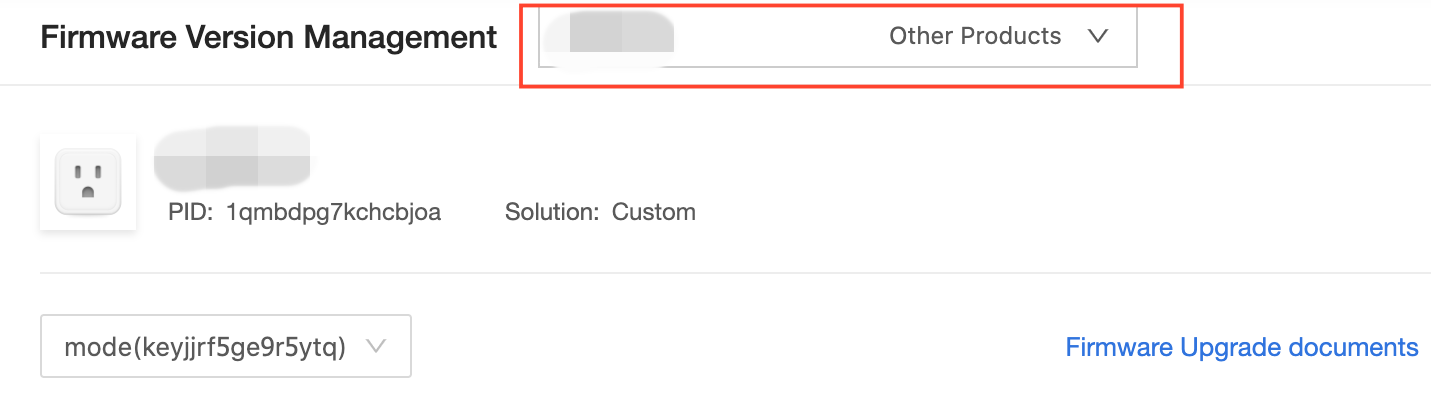
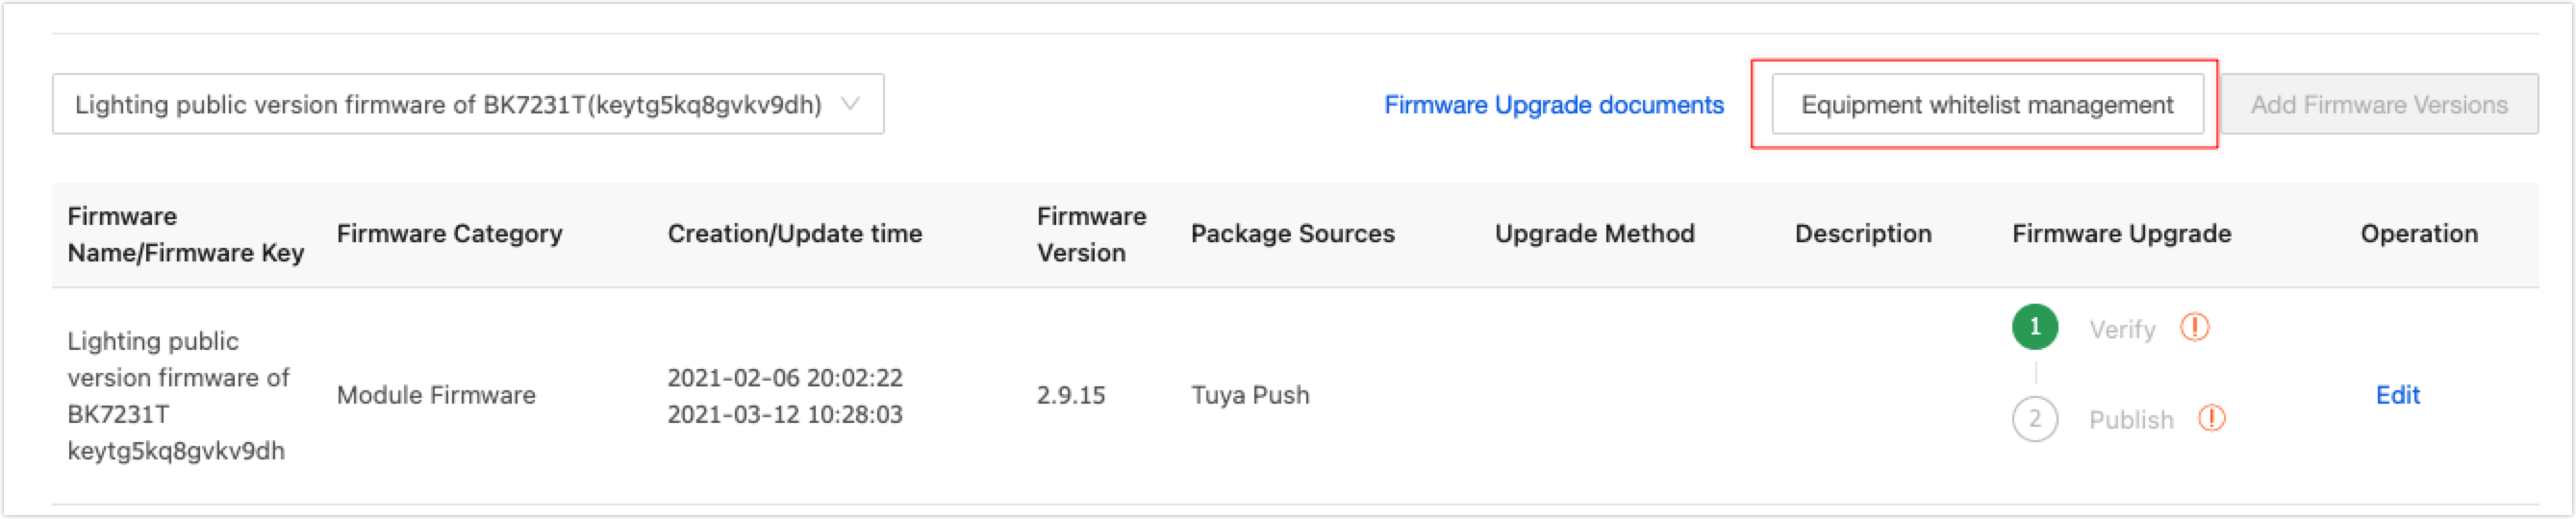
Log in to the Tuya IoT Platform and click Product Management.
-
Enter the Firmware Version Management page.
-
In the upper left corner, choose a firmware to update, select the version, and click Edit. 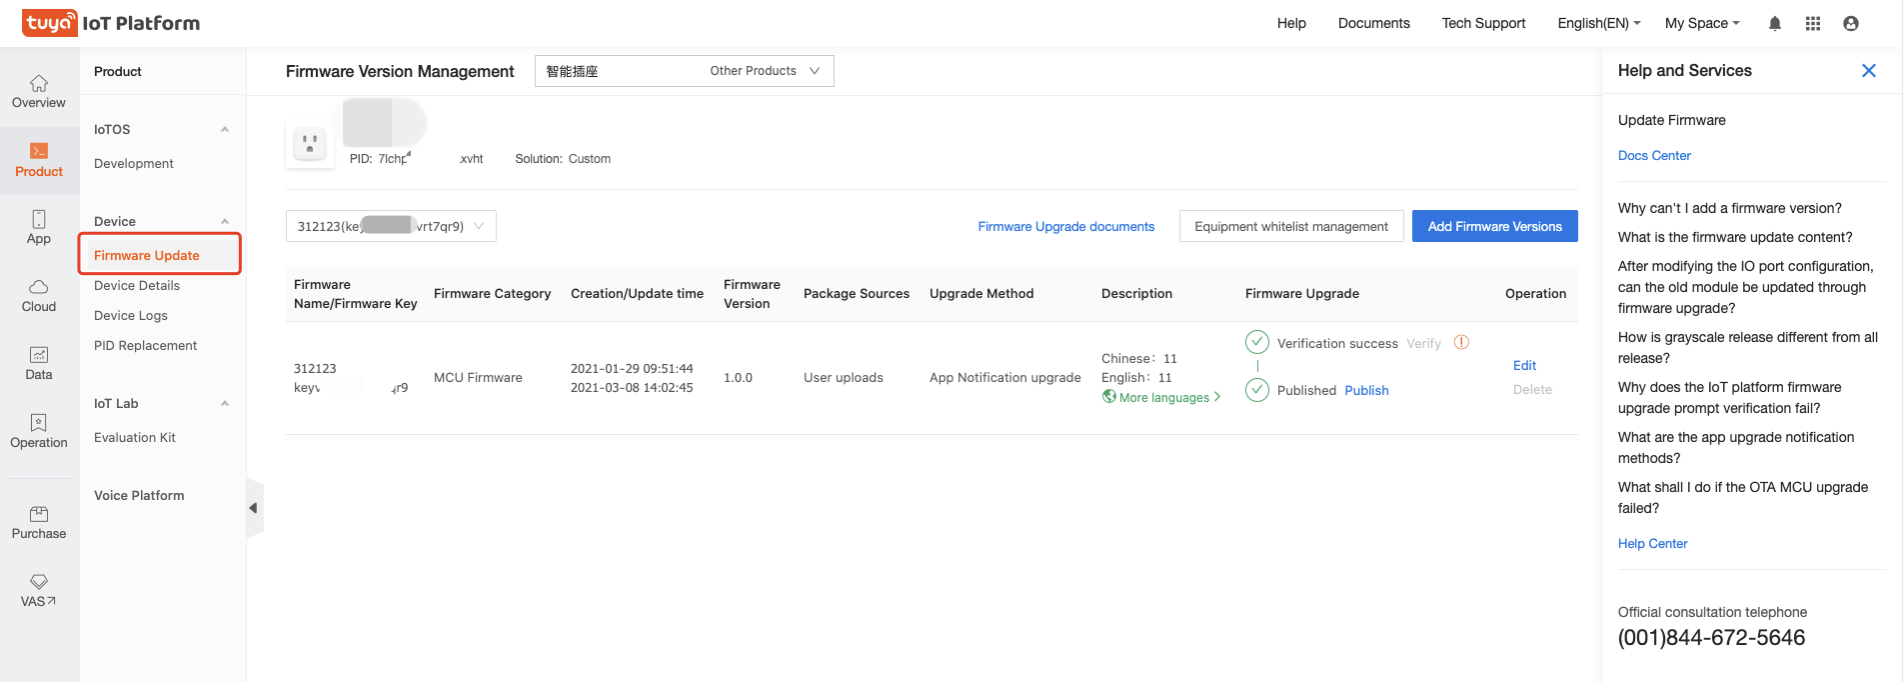
Note: A product may have multiple firmware. Choose the firmware you need to update, and select the version accordingly.
-
Enter the information and click Confirm.
-
Select an update method on the Tuya IoT Platform.
- Notification upgrade: Users choose to update or not when the app receives an update prompt.
- Forced upgrade: Users are required to update the device before they can continue to use it.
- App detects updates: Users can tap the device panel, and then tap the top right corner to check for updates.
-
Determine whether to update the firmware automatically: It is controlled by the Auto Upgrade switch on the Tuya IoT Platform and the Auto Upgrade on the app.
Note: A product may have multiple firmware. Choose the firmware you need to update, and select the version accordingly.
- Disable: If the Auto Upgrade is disabled, the updates will be executed according to the Update method specified in the previous step.
- Enable: If the Auto Upgrade is enabled, the updates will be executed in any method of App Notification upgrade, App forced upgrade, and App detects updates.
When the Update switch is enabled on the app, the device will be updated automatically according to the selected time slots.
-
Add update texts in Chinese and English.
-
Click Equipment whitelist management, and set an app user account to test.
-
You can select device ID in batches according to your app account. The whitelist devices shall be set first.
-
Select the area of the device, including China, America, Europe, American Azure, India, and Europe MS.
-
You can add new whitelist devices through your app account. After the app account is entered and verified, all devices of the product ID (PID) under the account will be added to the whitelist.
Note: For security reasons, the app account must be verified.
-
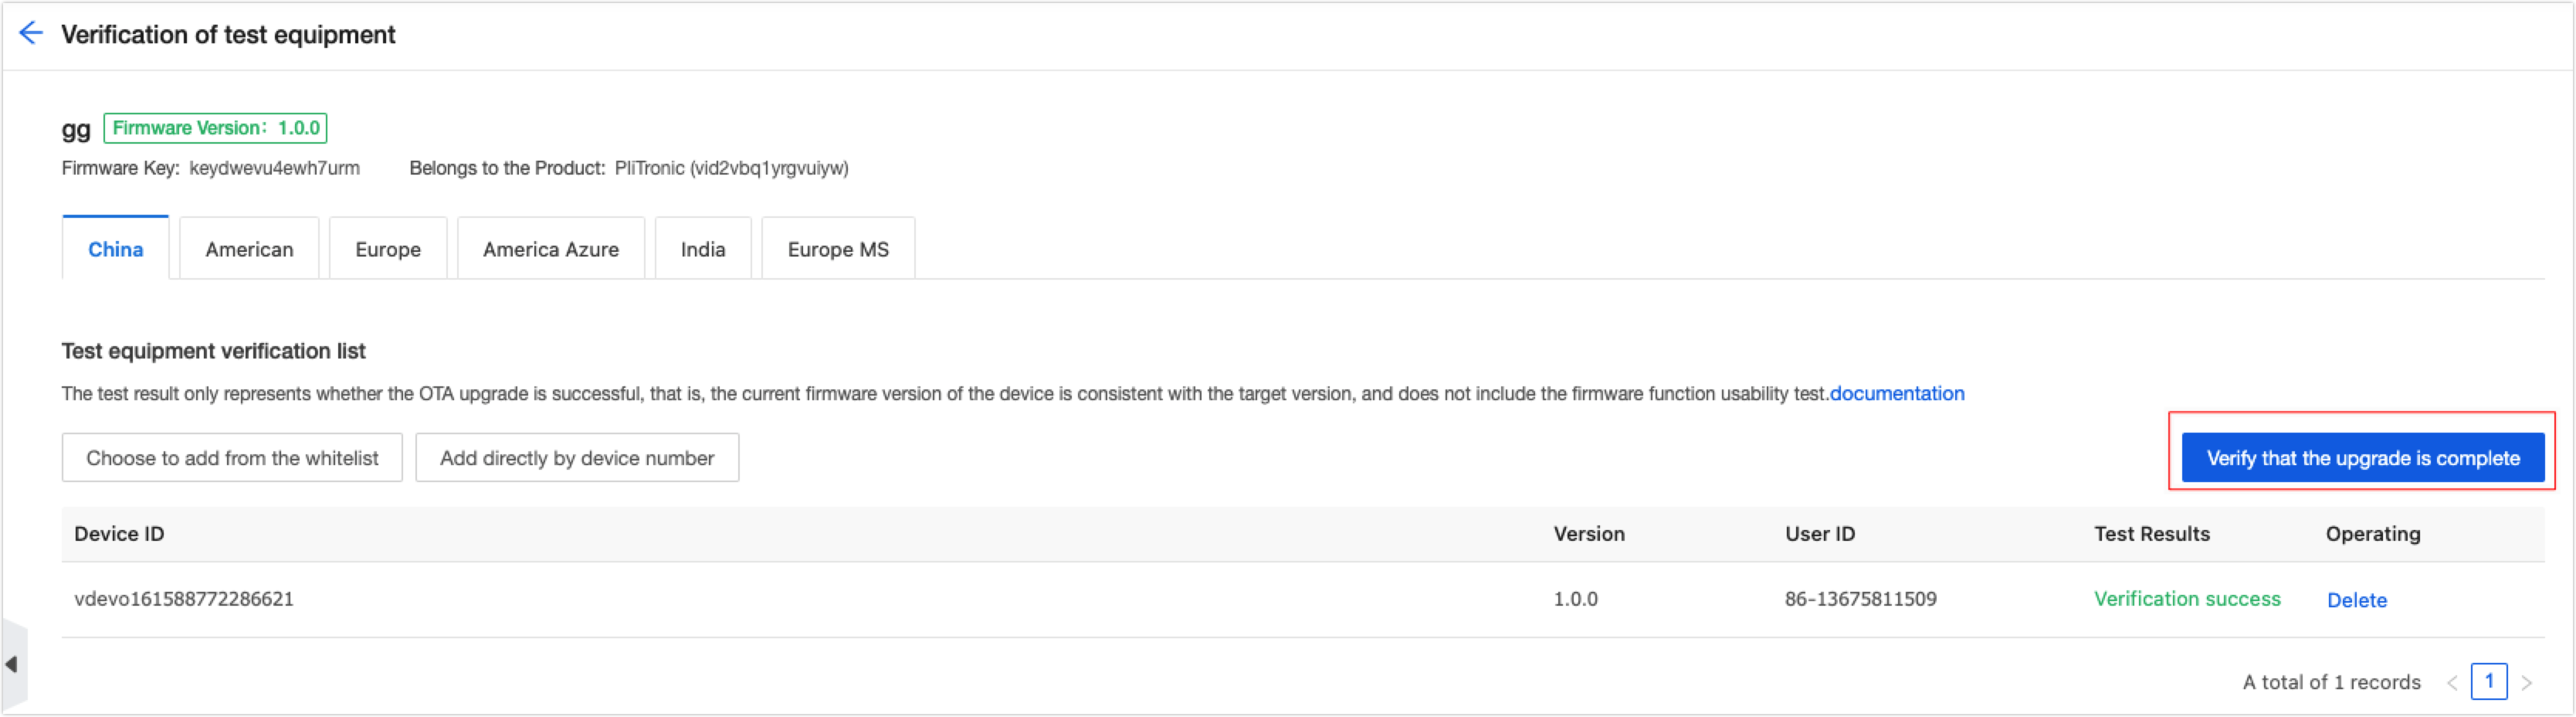
Push the firmware and verify.
-
Click Verify in the Firmware Upgrade area to enter the page below. You can verify in China, American, Europe, India, America Azure, and Europe MS. 
-
You can select either Add directly by device number or Choose to add from the whitelist to add a device. When the device ID is selected, the firmware will be pushed to the device.
-
Click Verify that the upgrade is complete to verify the device.
-
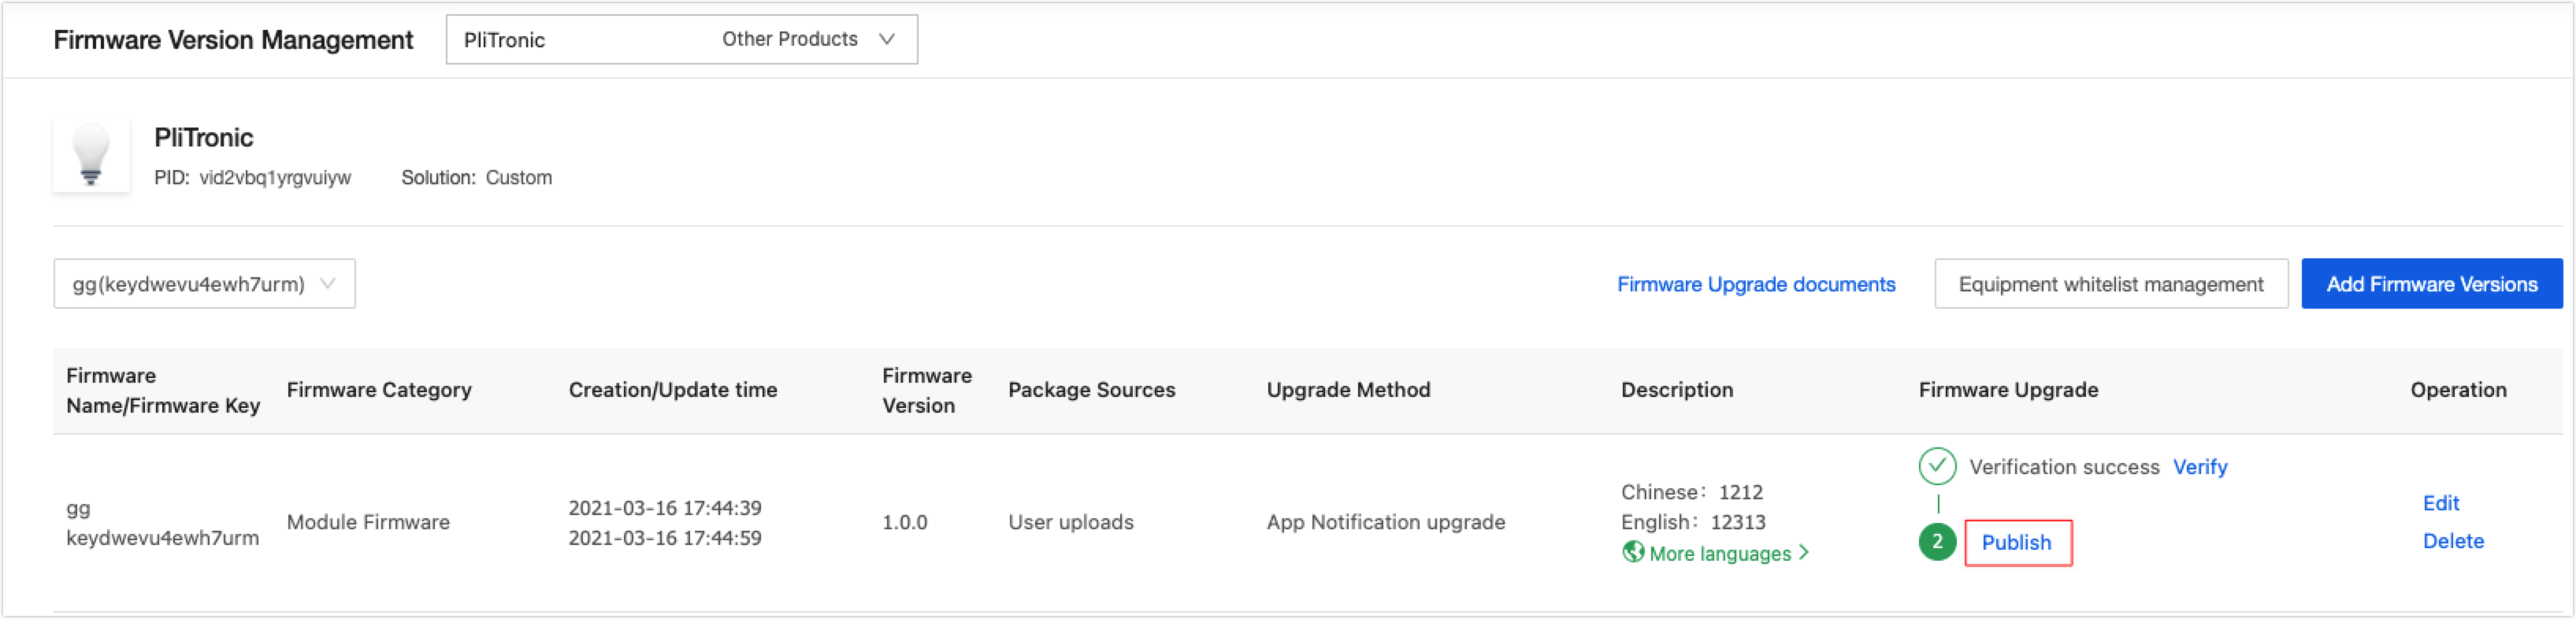
Release OTA firmware updates.
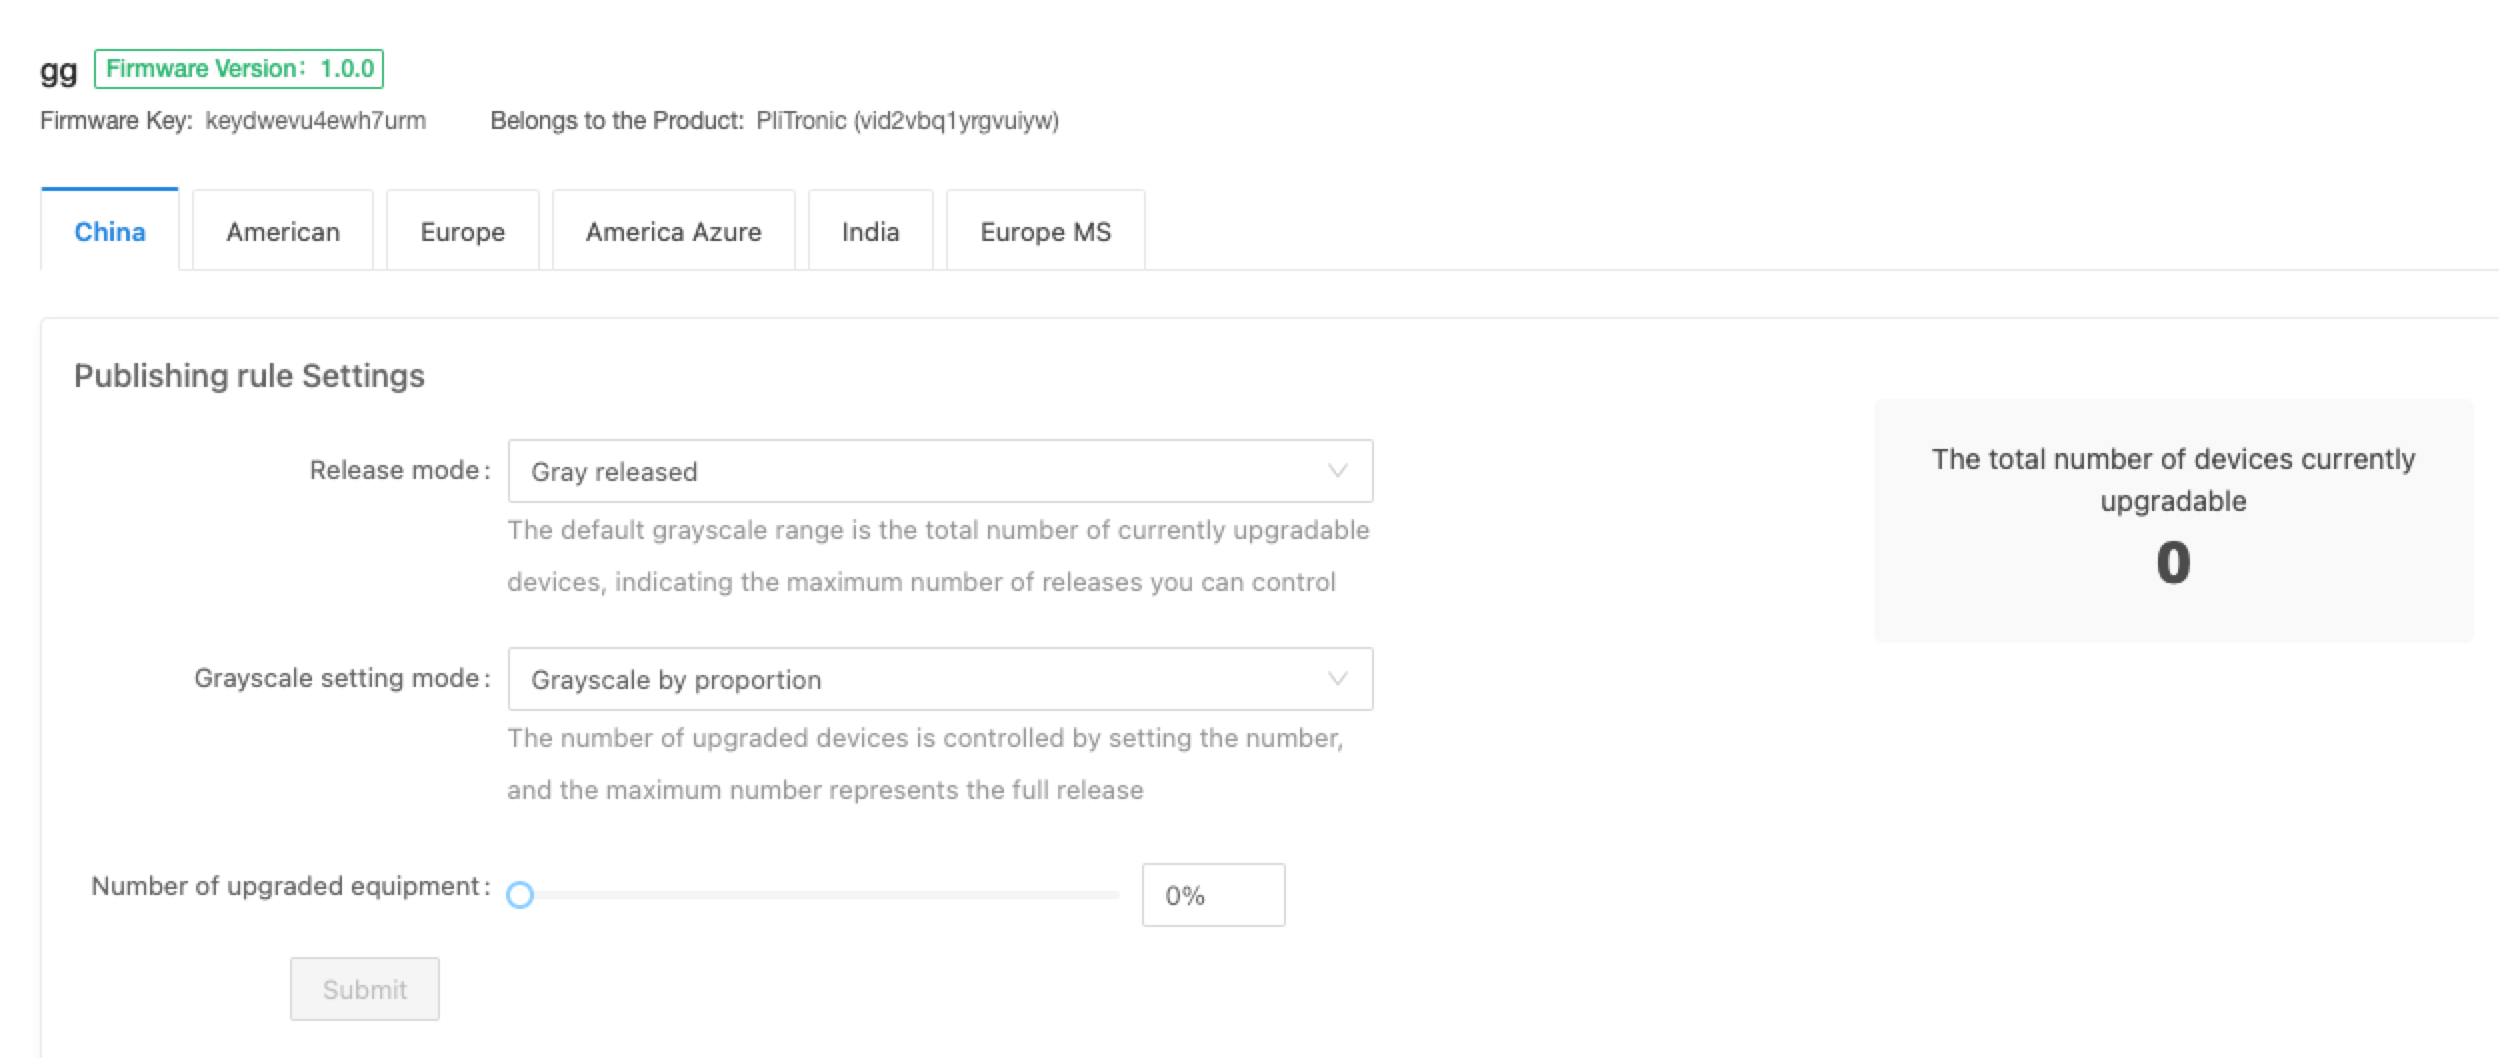
After the verification is successful, click Publish to enter the Release a new version page. The following describes the new and old processes to release updates.
The new process to release updates
- Click Publish to enter the Release a new version page.
- In the Publishing rule Settings area, select Gray released mode, and you can release updates by the data area (not the geolocation of the device) and proportion.
Note: You can also click Switch to the old version and use the function provided by the old process. The old release process will be retired later and you will be notified in advance.
- The devices in different data areas are isolated from each other, you can switch between the data area to select devices and release updates accordingly.
- The number of upgraded equipment: You can adjust the grayscale proportion to send updates to a specified proportion of devices. It is recommended to set a small proportion, such as 5%, for the early release. You can determine the proportion for each release by the data in the release process until the updates are generally available.
- Release suspension: If you encounter any firmware problems during the release process, you can suspend the release to reduce the impact and resume the release after troubleshooting.
- Upgrades publish core data: The following information is displayed
- Total number of upgradable devices
- Specifies the number of devices to upgrade
- Trigger devices
- Successfully upgraded devices
- Data analysis: Includes Upgrade status distribution and Distribution of upgrade times.
- Data trend: View the trend chart of the number of devices triggered by the upgrade and the number of devices successfully upgraded over time.
- Upgrade devices details: Includes the update details of the devices by the device ID.
The old process to release updates
-
Click Publish to enter the Release a new version page.
-
Click Switch to the old version. 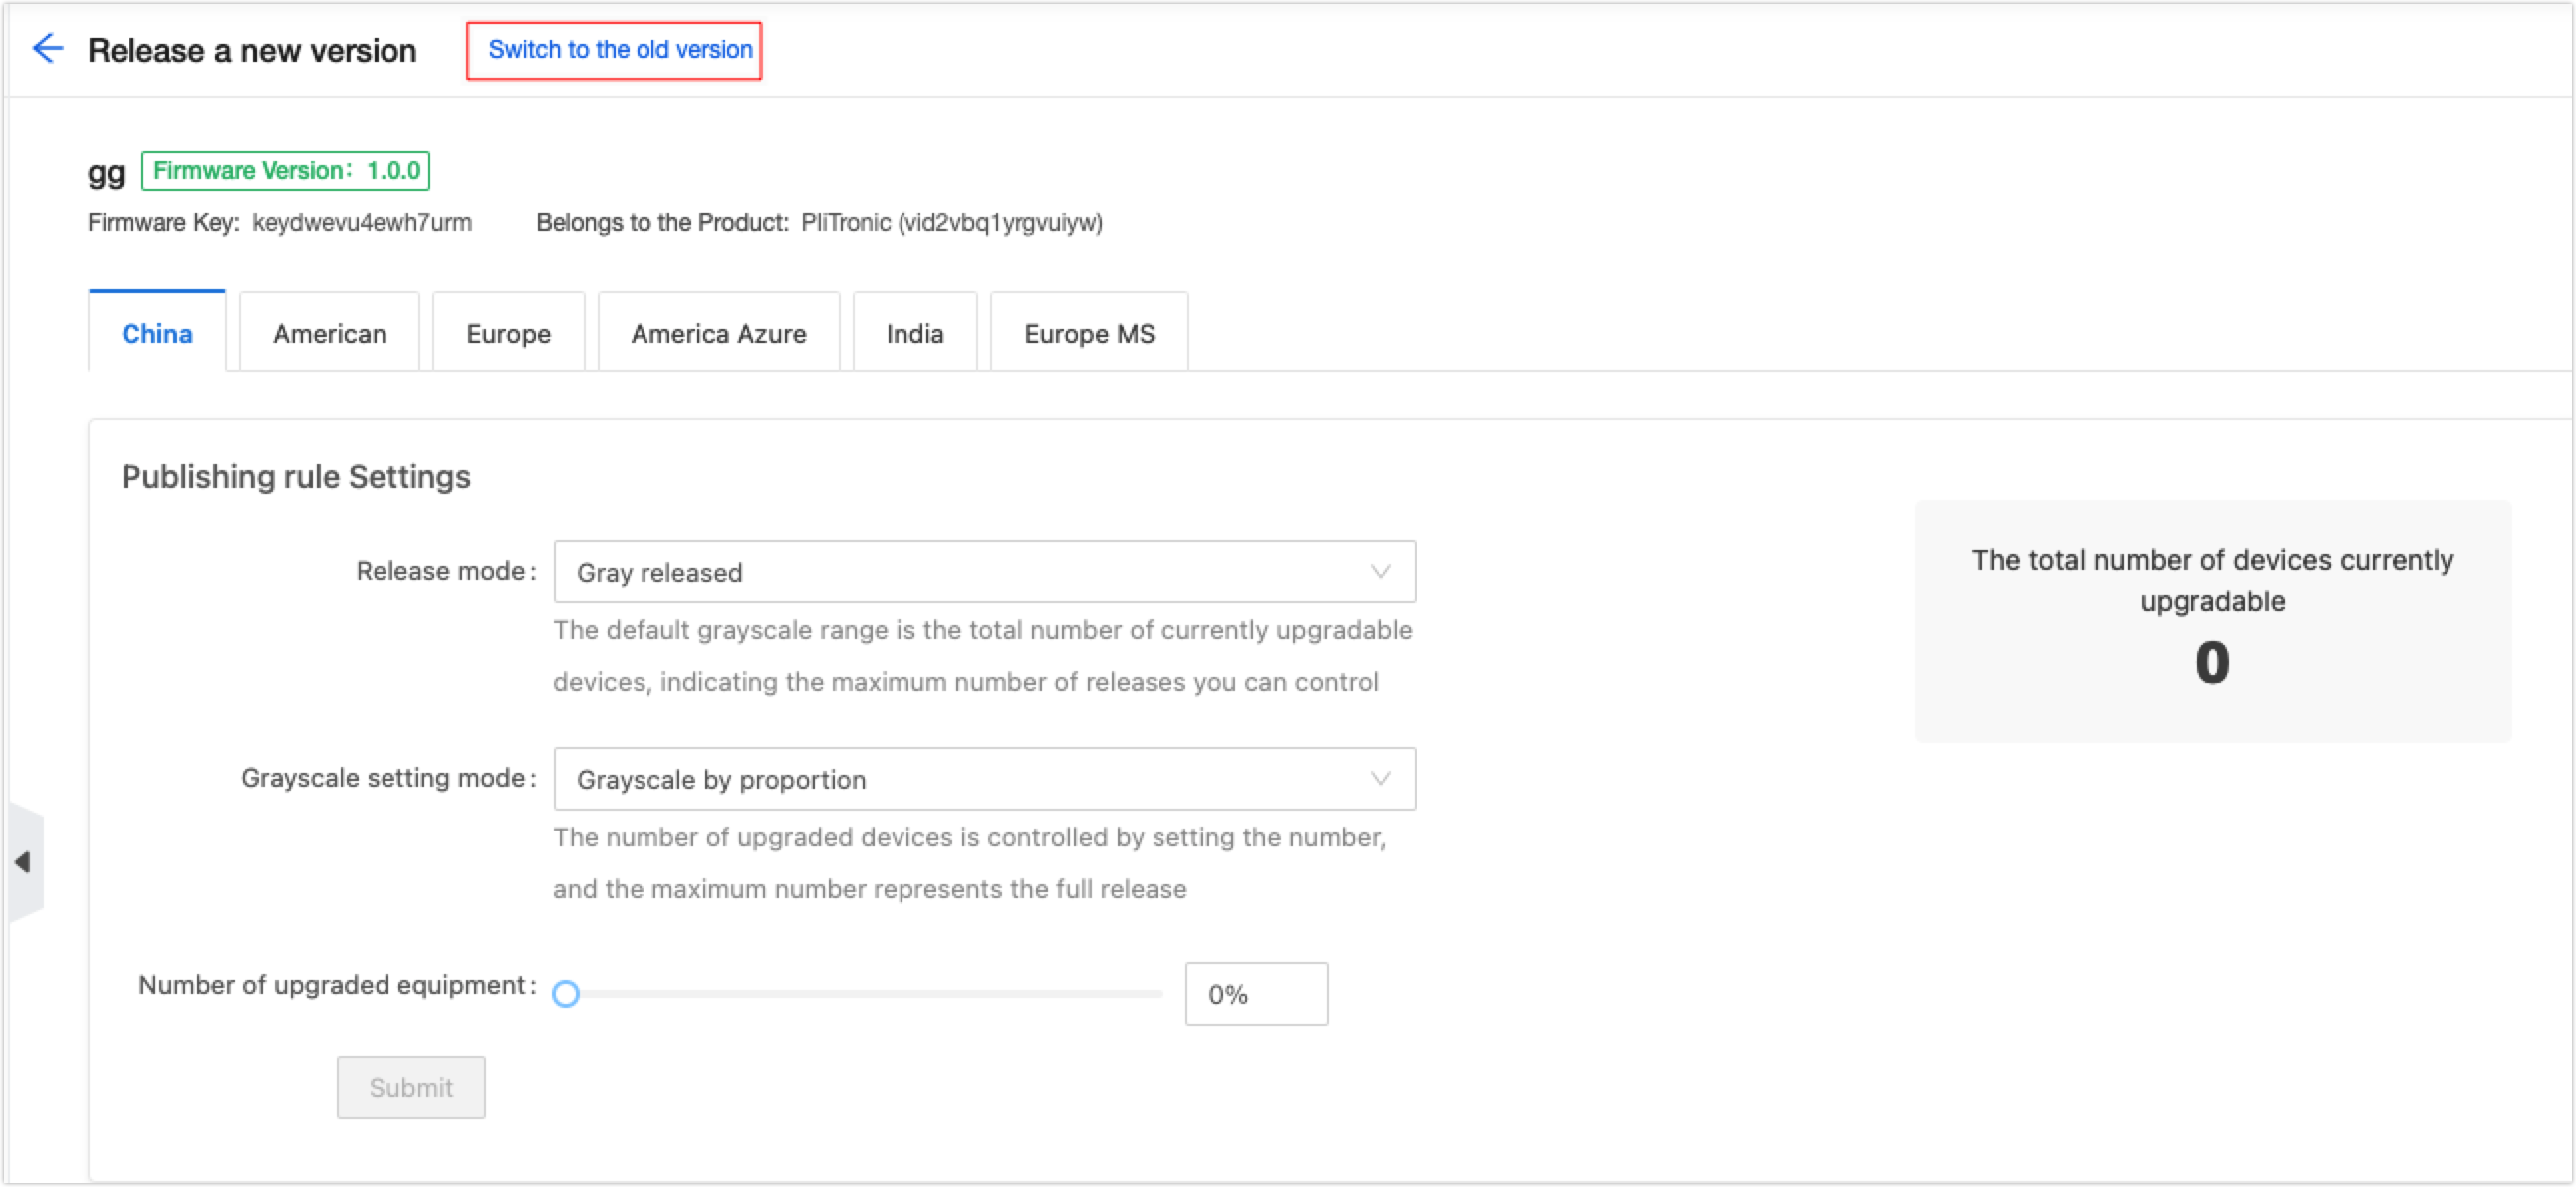
-
After you click All Publish or Grayscale Publish, the system automatically submits an application. Tuya will verify the publishing and firmware security. After the application is verified, Tuya will push it to the users in the selected areas.
- After the test device passes verification, OTA firmware can be published.
- The firmware can be released in numerous areas.
- All Publish and Grayscale Publish are supported, and you can set the release time. In terms of Grayscale Publish, you can set the Area (multiple selections), Quantity, and Version (multiple selections).
- After the release is confirmed, it takes 24 hours to verify the unverified firmware. Verification time is not required for the verified firmware.
Method 2: Upload or update firmware by yourself
If the device is developed with custom solutions, such as MCU SDK, module SDK, and SDK, the custom firmware is supported. The steps are as follows:
-
Log in to the Tuya IoT Platform and click Product Management.
-
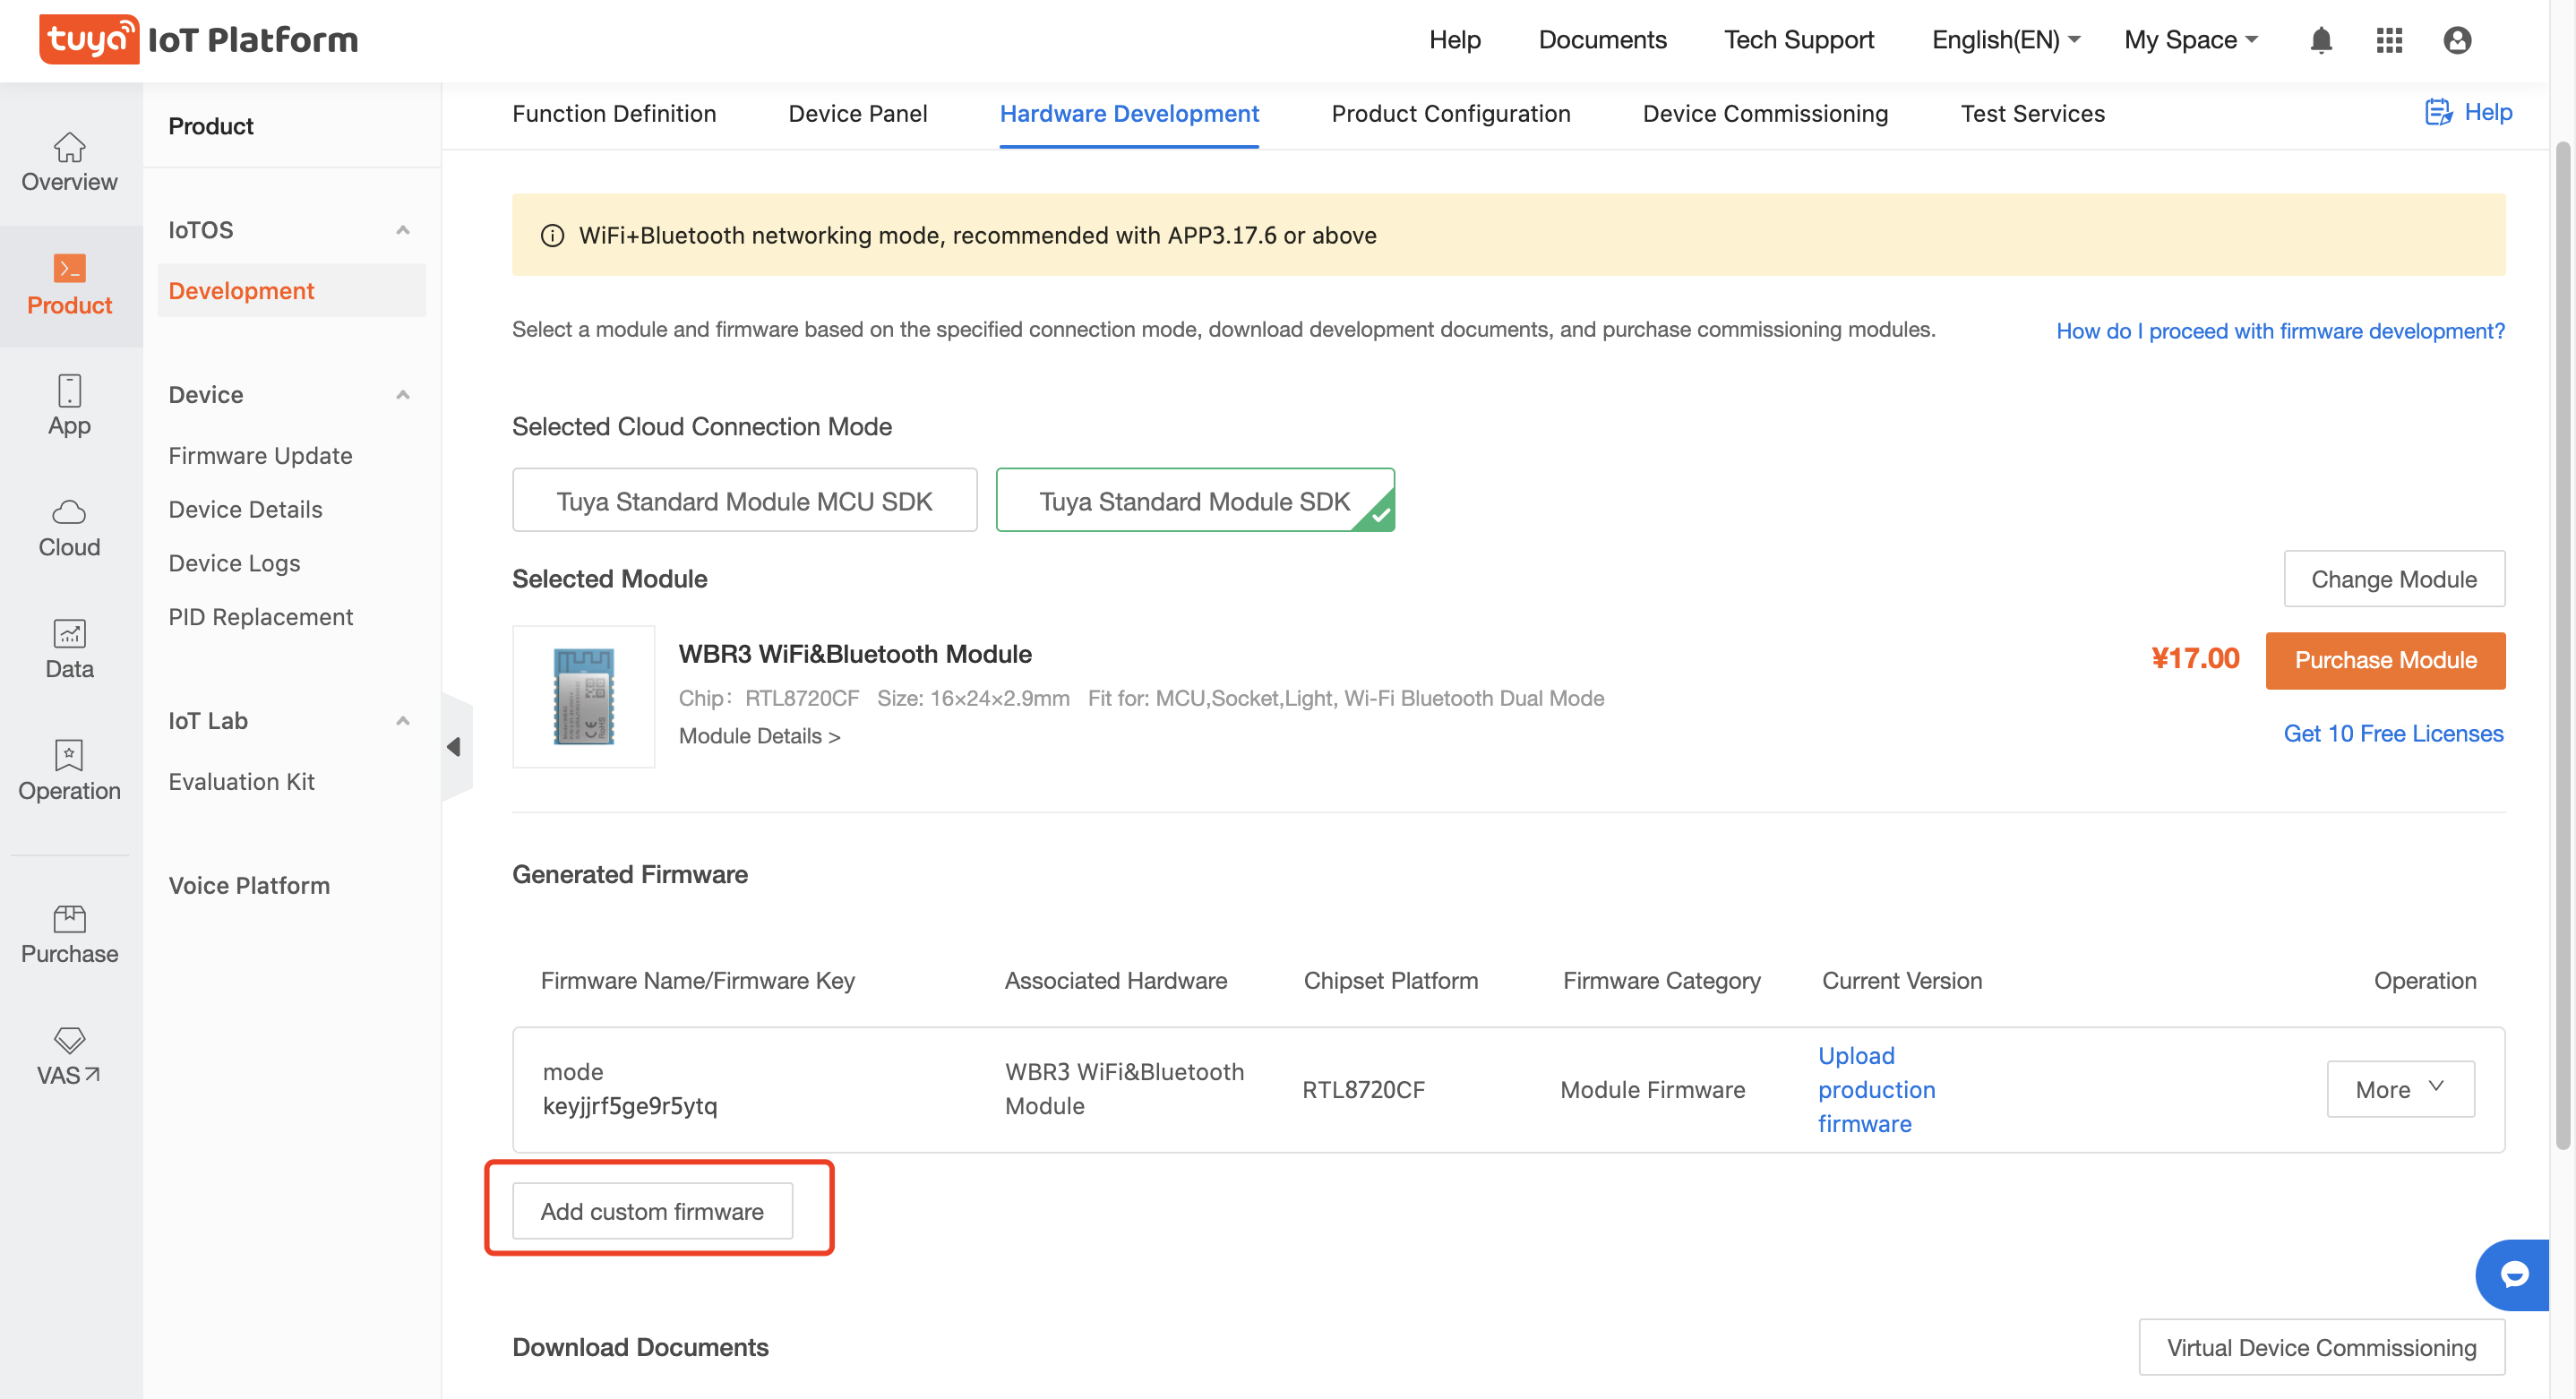
Hover the mouse cursor over one of the products Developing, and click Continue to Develop.
-
Go to step 3 Hardware Development.
-
After selecting a Tuya firmware, click Add custom firmware and enter parameters.
| Parameter |
Description |
| Firmware identifier |
The main key for firmware management. You can enter the information according to your own management specifications. |
| Firmware name |
Includes names in Chinese and English, which is used only for firmware management but not for display. |
| Firmware type. |
You can select the firmware type according to your development method:- If MCU SDK development is used, it is recommended to select MCU Firmware when uploading MCU firmware.
- For other development methods, select Module Firmware as the master communication firmware.
- If the module firmware is occupied, you can select a category according to your own module communication type.
|
| Channel number |
A channel number is preset for module firmware, Bluetooth firmware, Zigbee firmware, and MCU firmware. You do not have to select a channel number again. For more information about Upgrade Channel, see Glossary. |
| Chip platforms |
Select according to the chip used for the firmware development. If there is no chip platform, select other. If other is selected, the chip supports OTA updates but does not support Tuya’s flashing tool. And you cannot upload the production firmware package. |

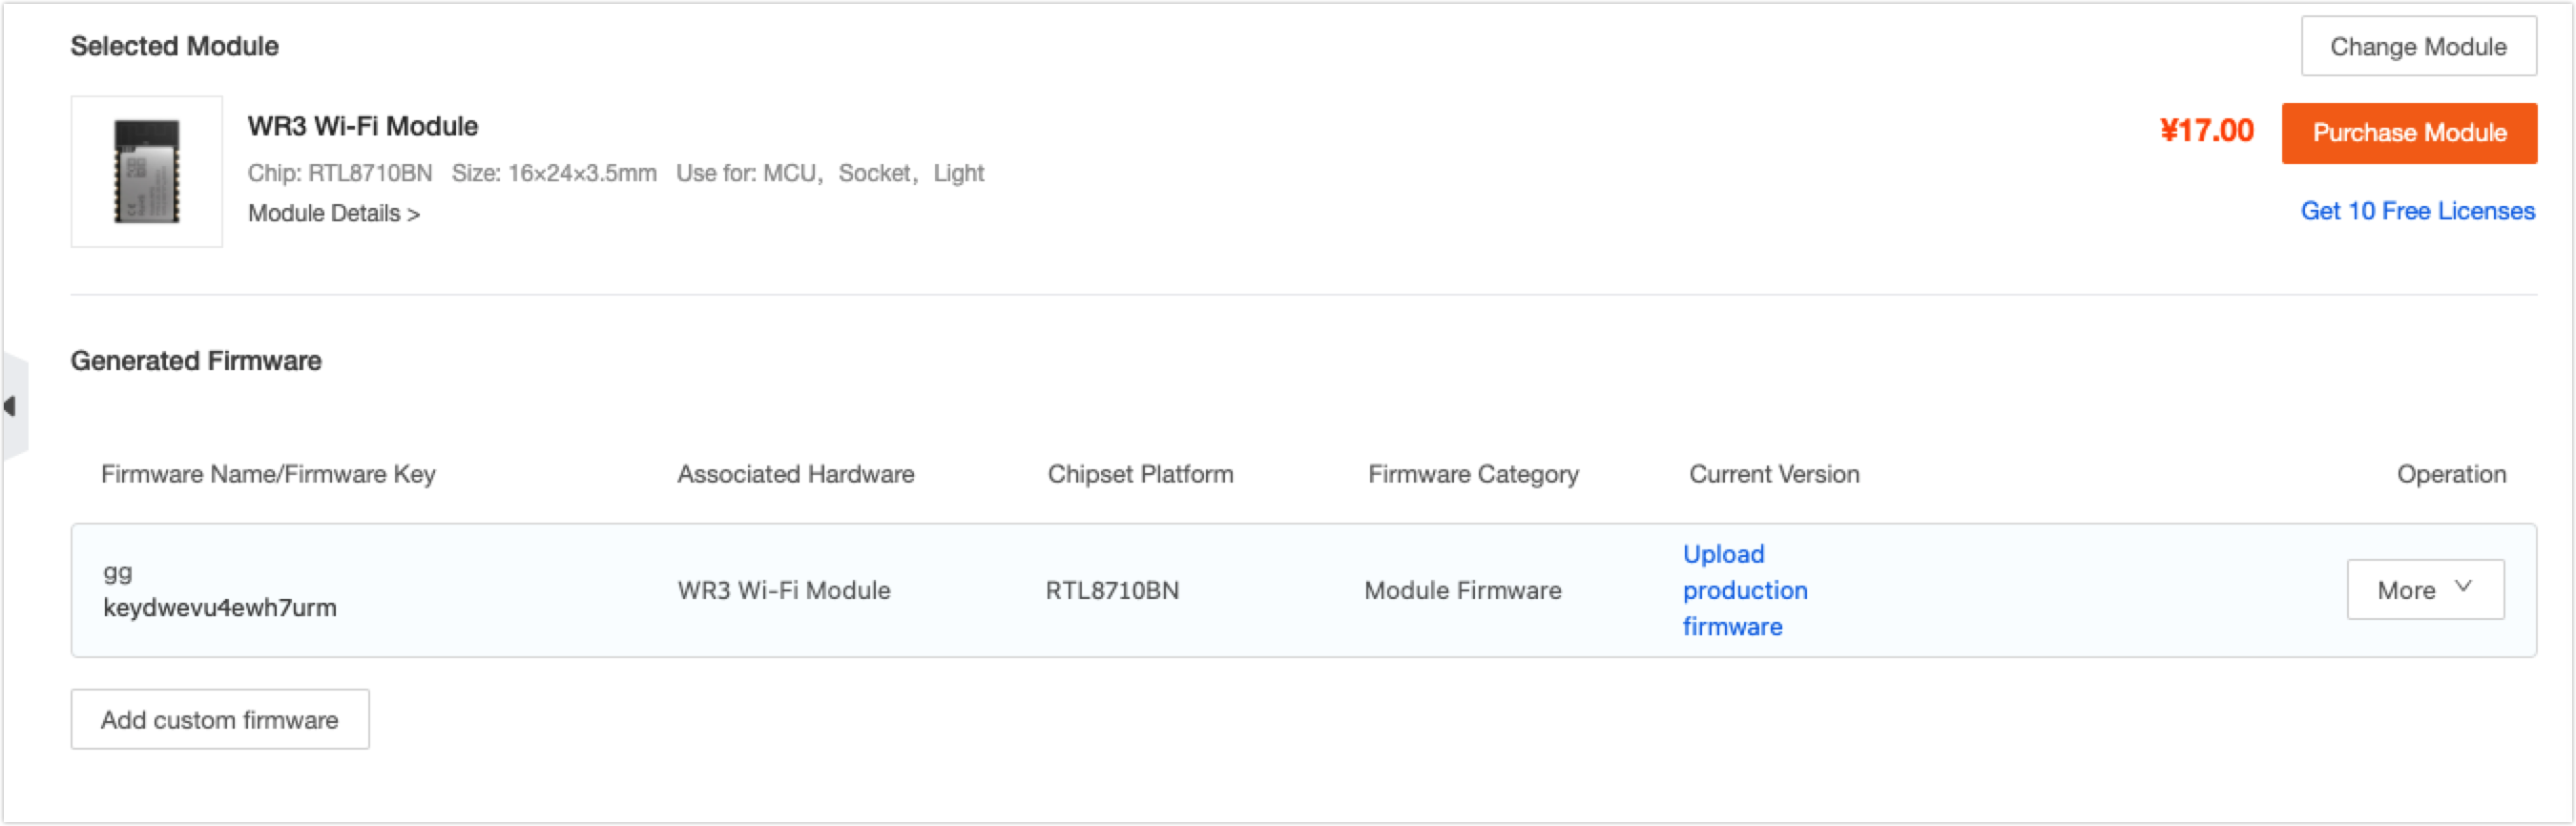
-
After the firmware is successfully added, you can Edit, set OTA Upgrade, Clear Firmware, and Upload production firmware.
-
Edit: If there is firmware package information, you can modify the Chinese Name and English Name of the firmware, and Firmware upgrade timeout.
-
Upload production firmware: The chip selected from the Chipset Platform is supported by Tuya’s flashing tool. You can upload the production firmware package and flash the firmware with Tuya’s flashing tool.
-
OTA Upgrade: All the firmware can be upgraded by Tuya OTA upgrade.
-
Clear Firmware: When the firmware package is not uploaded, the firmware can be deleted.
Upload the production firmware.
When you are adding custom firmware, if the selected chip is a Tuya standard chip, you can see the Upload production firmware entry in the Generated Firmware list. For more information about Tuya standard chips, see Glossary.
-
Click Upload the production firmware.
-
On the Upload production firmware page, enter the firmware parameters to enable the Tuya host to flash the firmware.
| Parameter |
Description |
| Firmware version |
Required. You can define yourself. |
| Production firmware/User Area Firmware |
Required. You can upload the same firmware package. |
| Allowed modes |
Select according to the flashing method. Select DOUT for 8285 chips and QIO for other chips. The other two types are seldom used. You can also determine which mode is required according to the name of the built SDK. |
| Firmware using SDK version |
Select the SDK version for firmware development. |
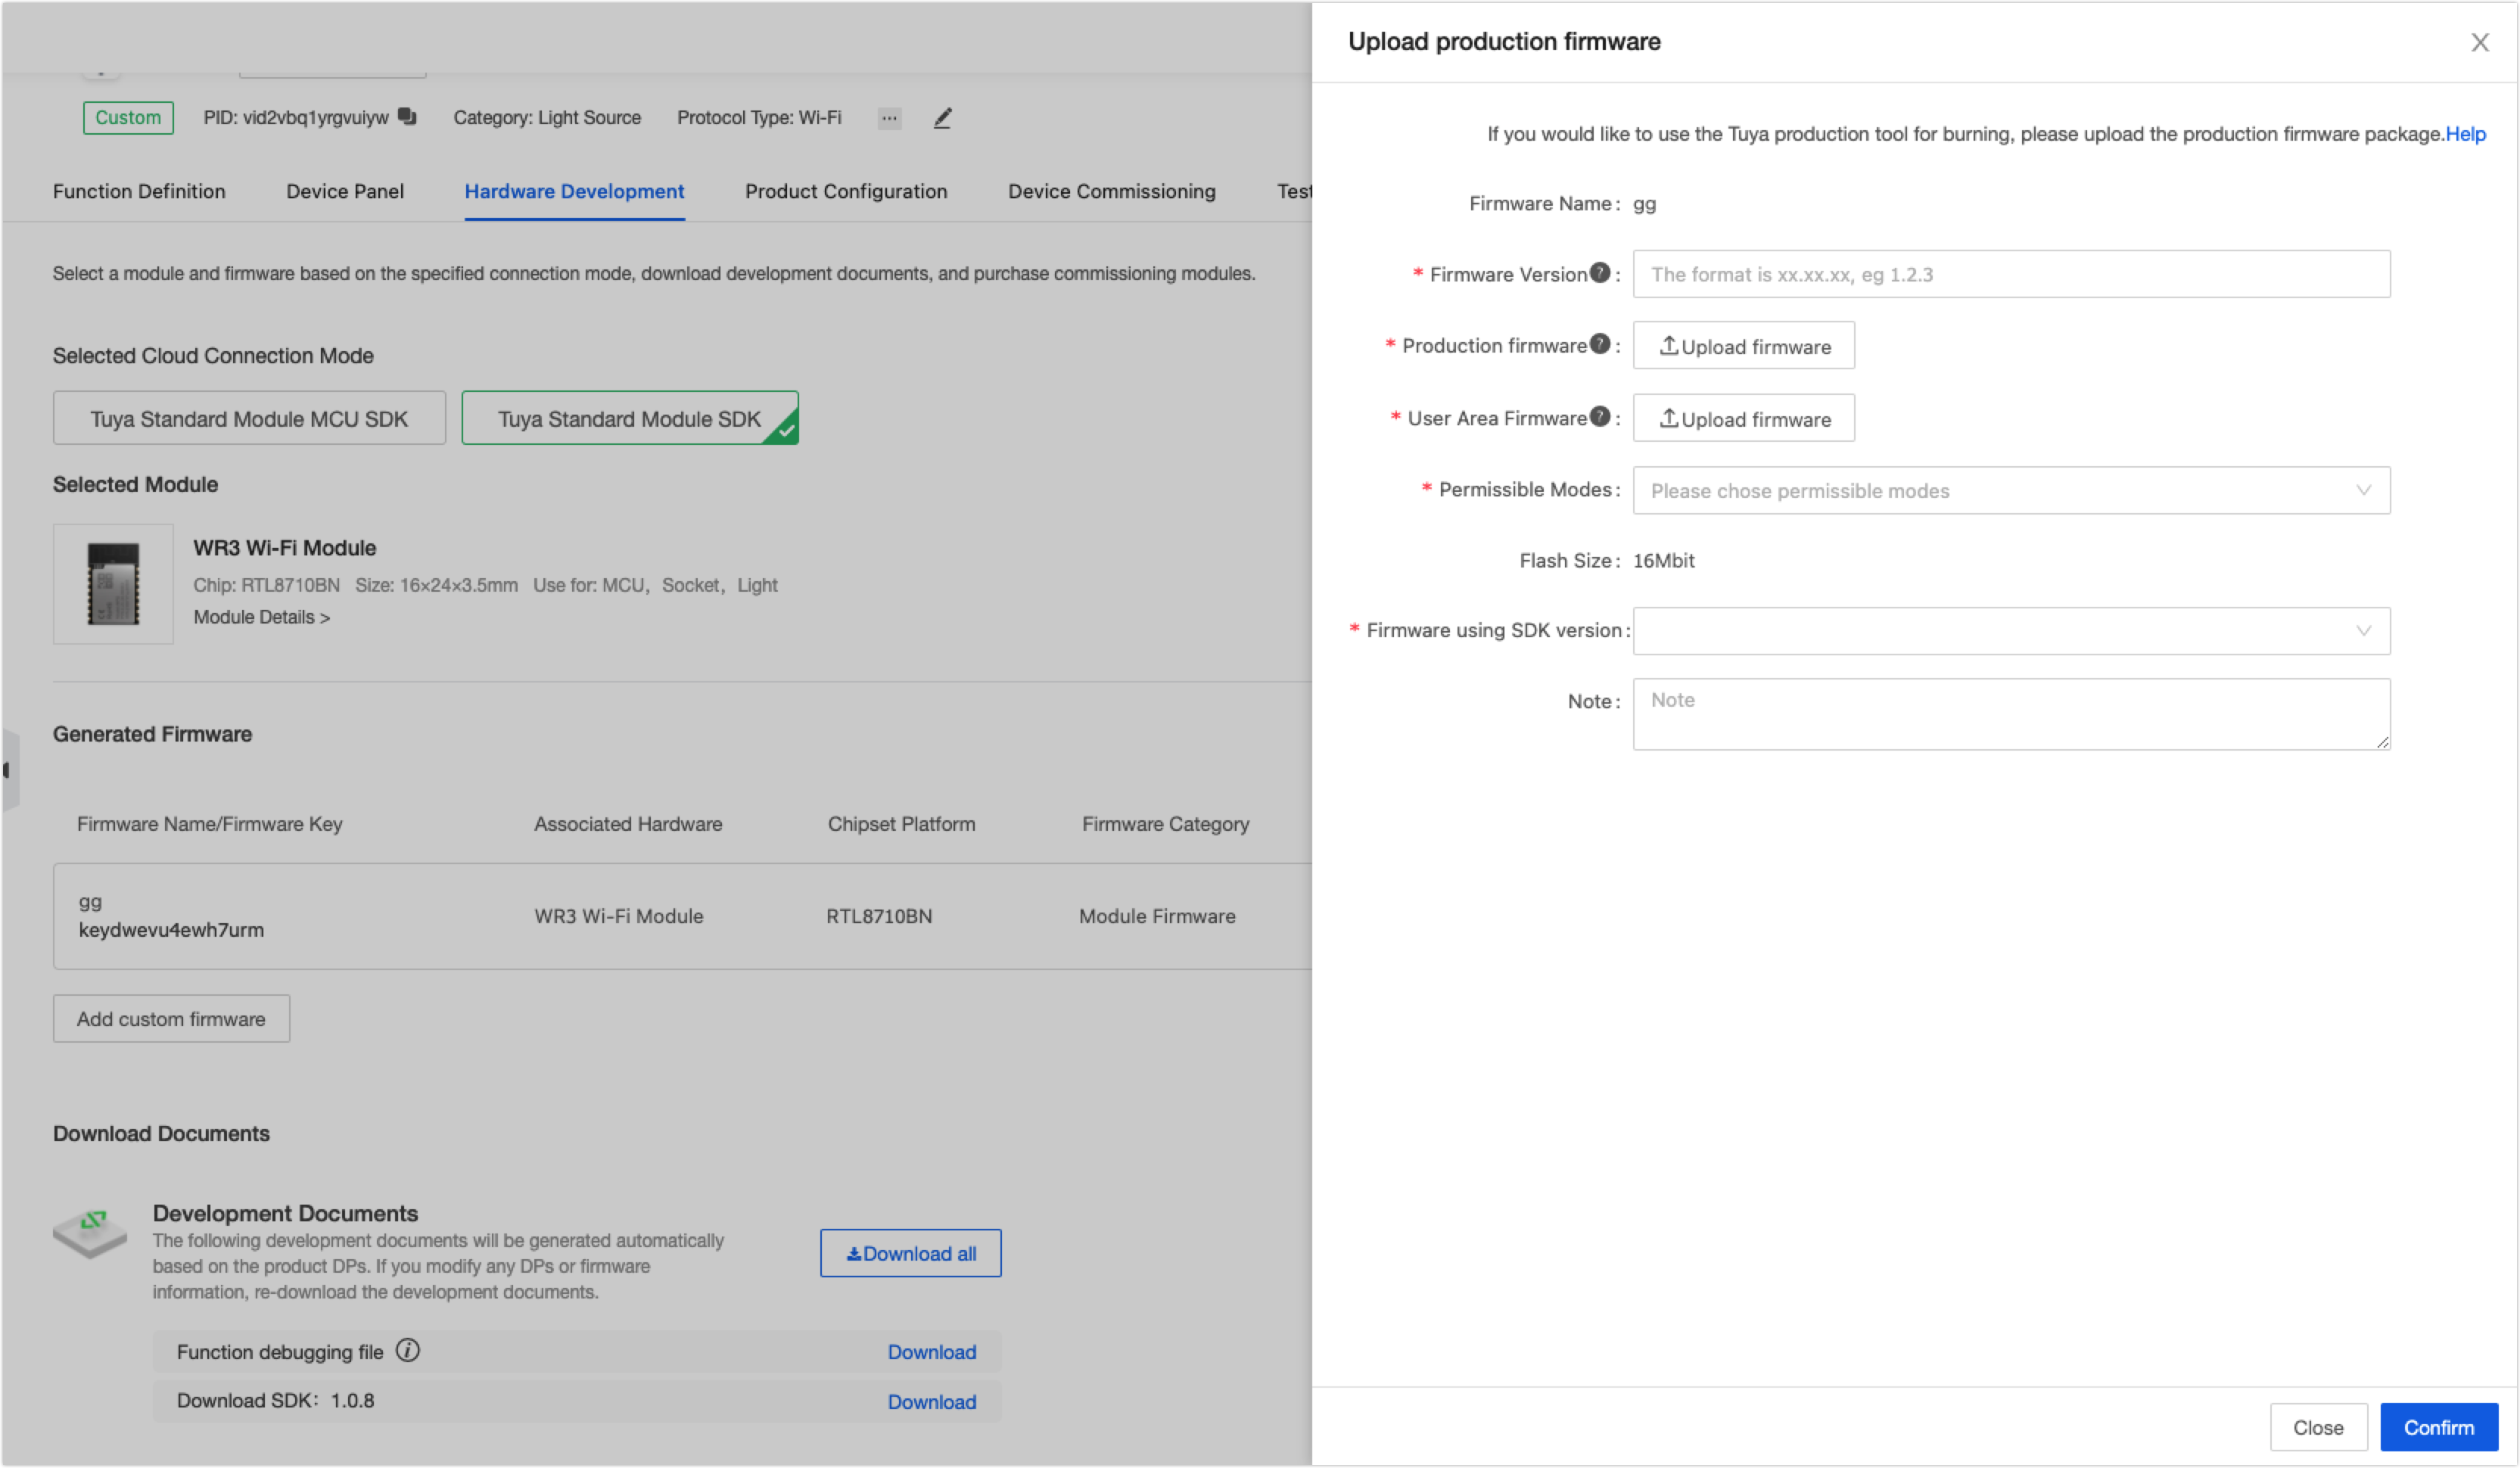
-
Click Confirm to complete.
OTA firmware updates
If the chip is a non-Tuya standard chip or others, the production firmware package cannot be uploaded but the OTA update is available.
-
On the Tuya IoT Platform, you can find the OTA firmware function through the following methods.
-
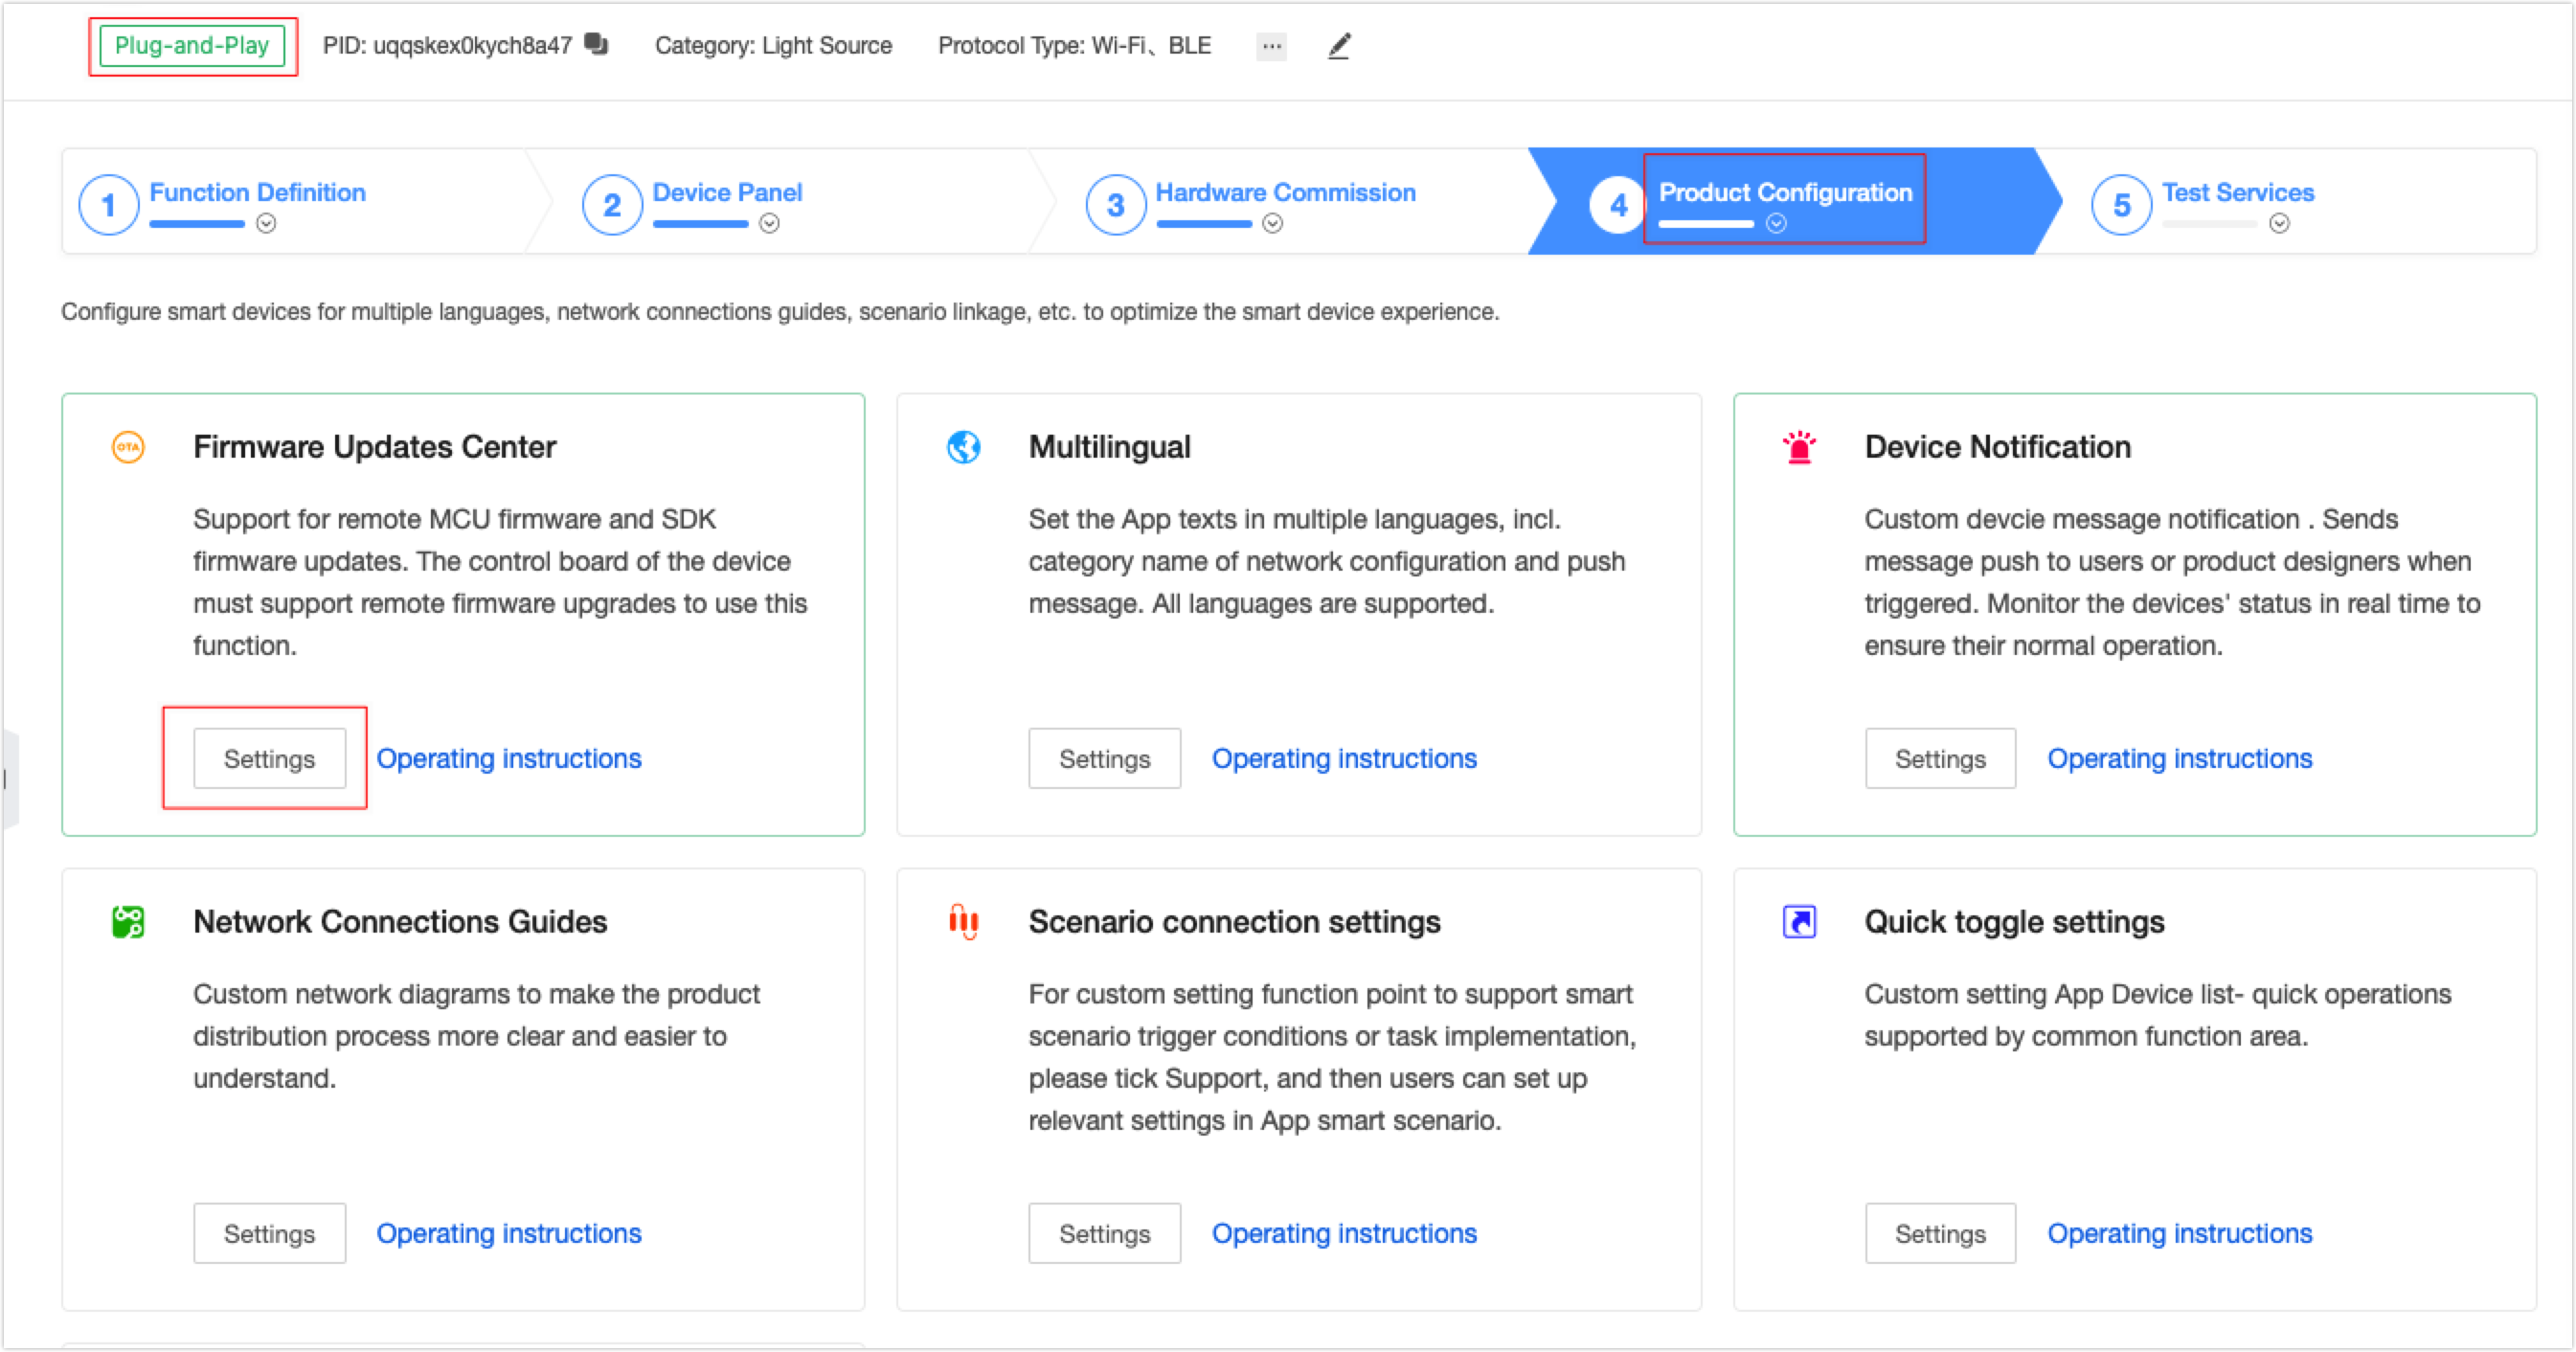
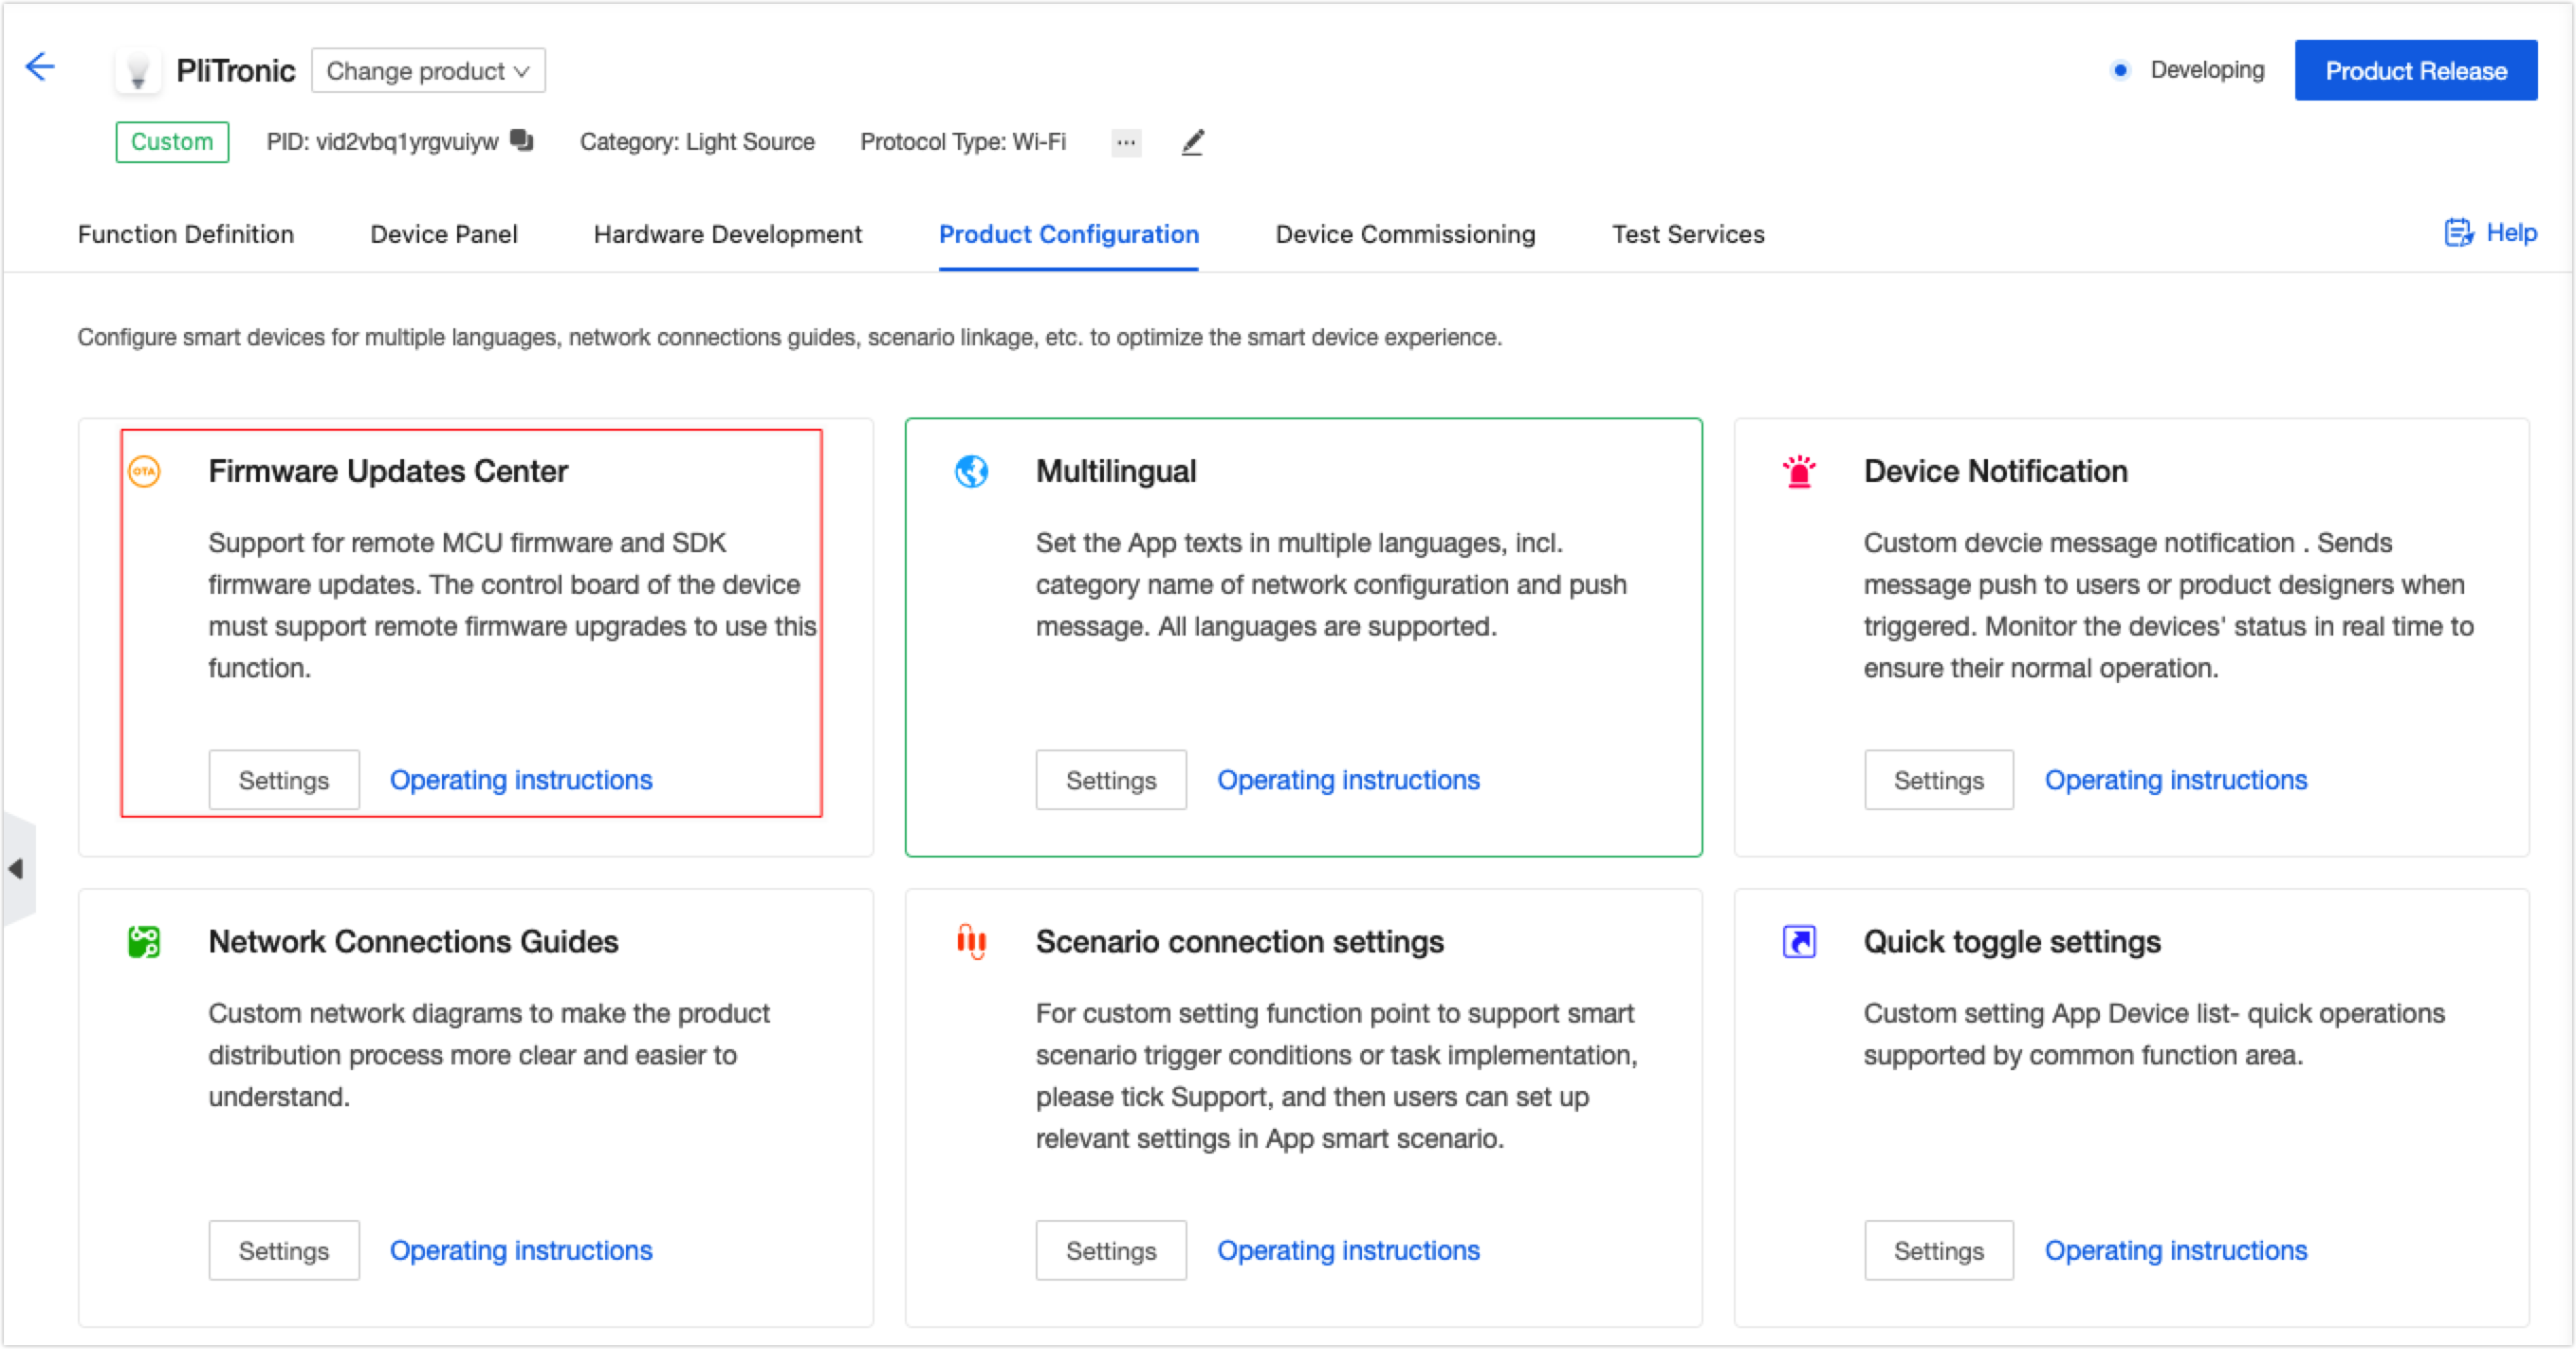
Select a custom product in Developing, and click Continue to Develop. In the Product Configuration area, choose Firmware Updates Center > Settings.
-
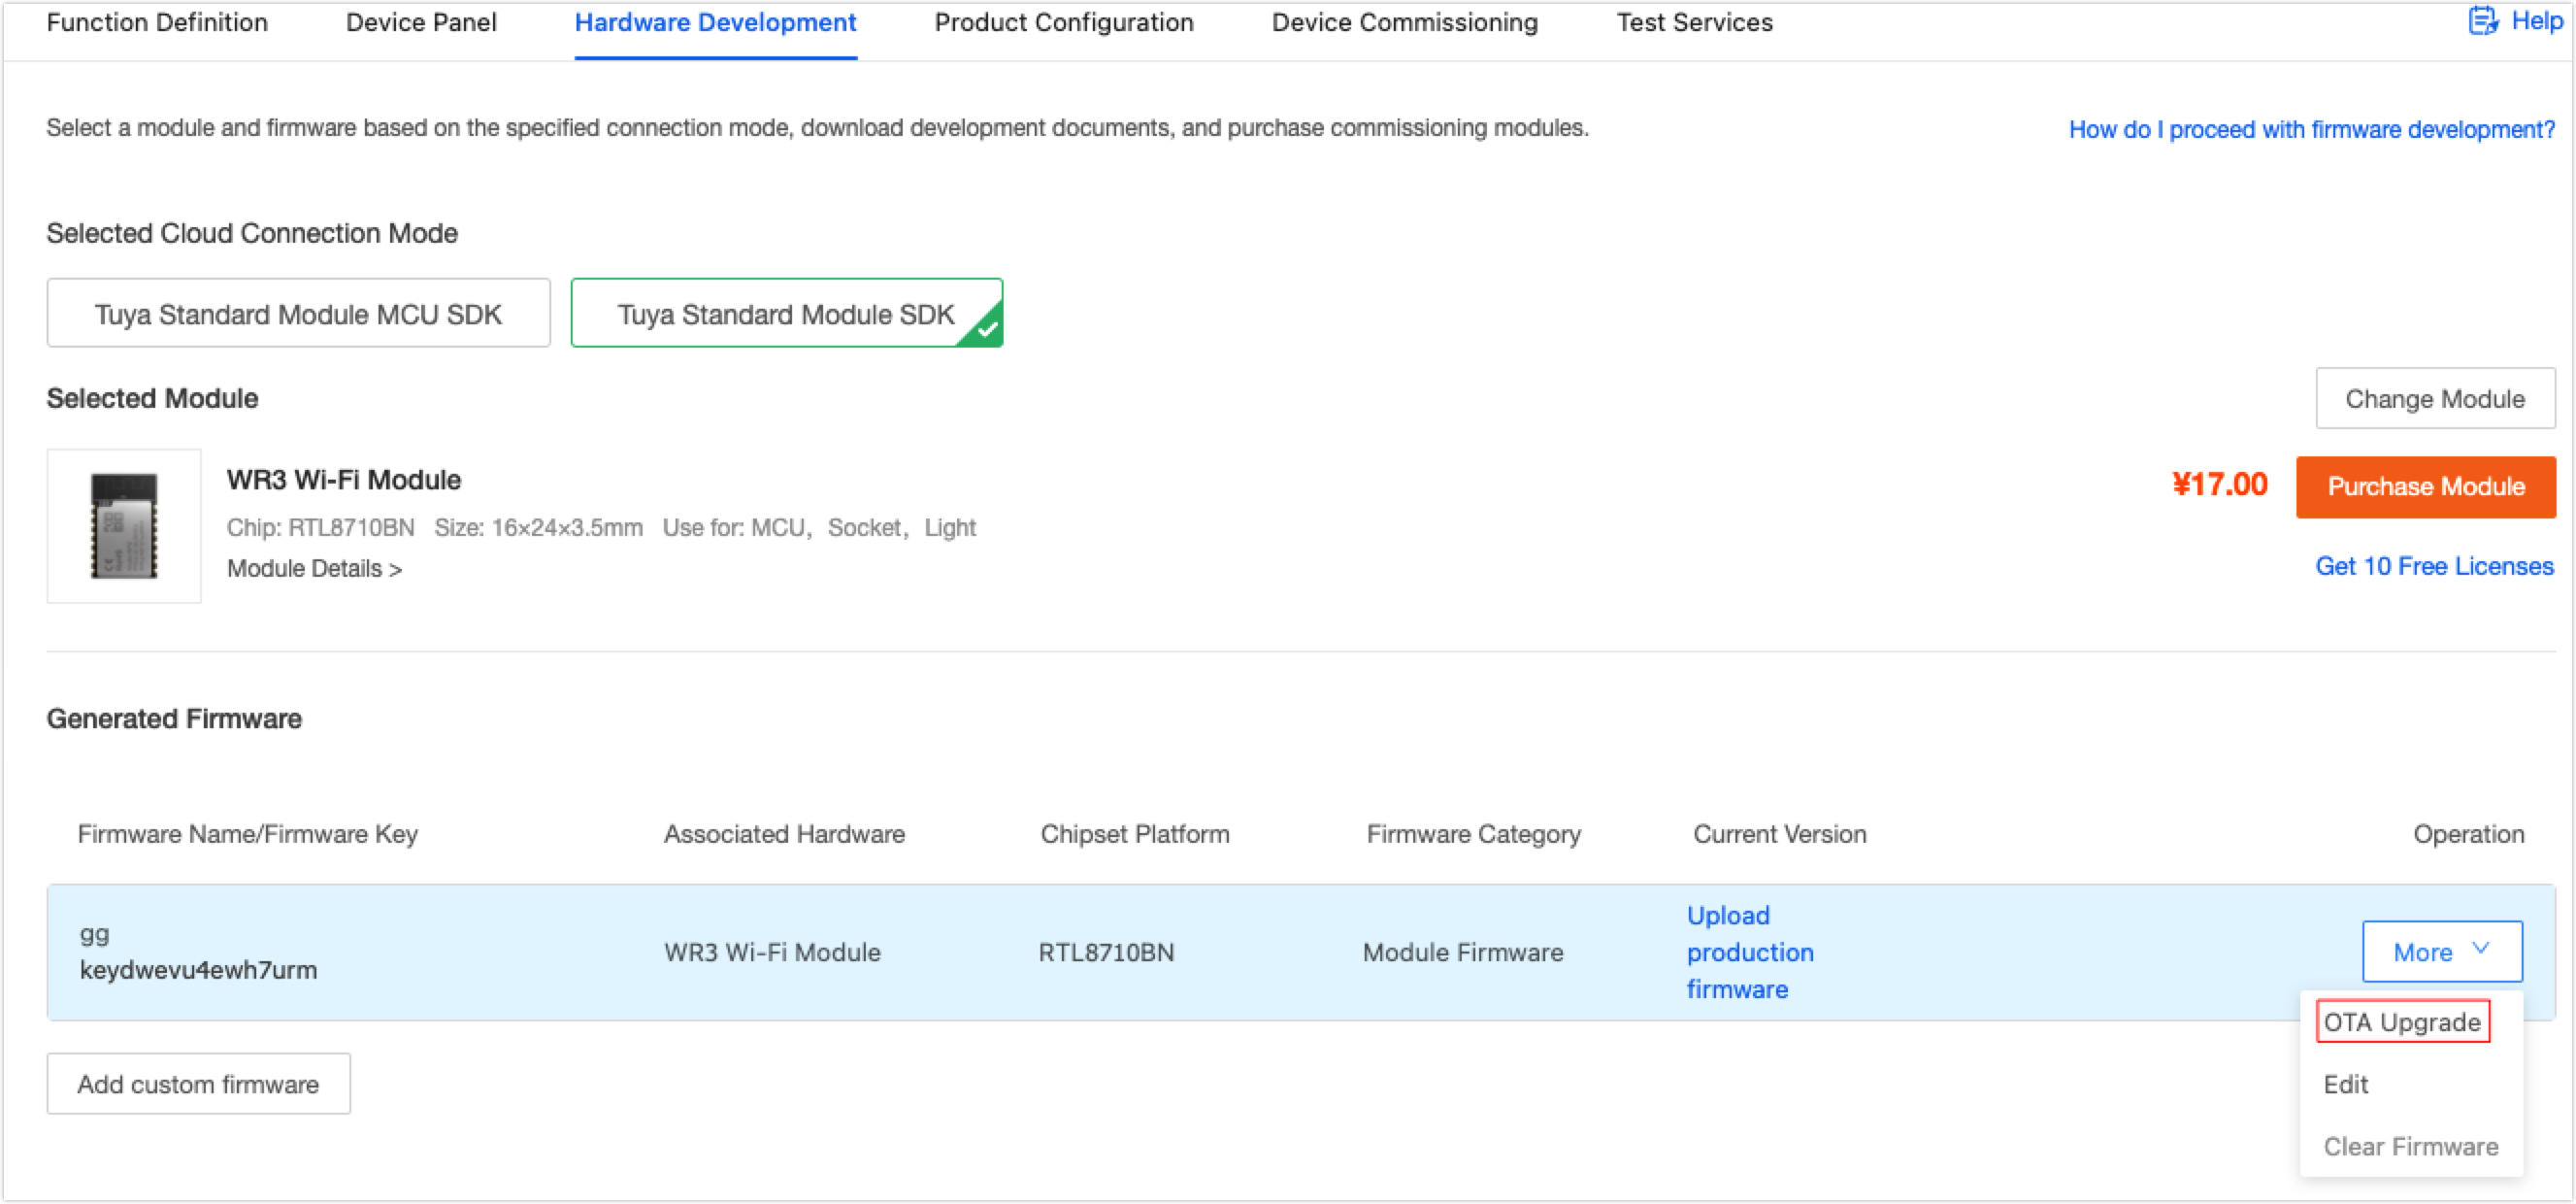
Select a custom product in Developing, and click Continue to Develop. Choose Hardware Development > Generated Firmware, click More, and select OTA Upgrade to enter Firmware Version Management page.
-
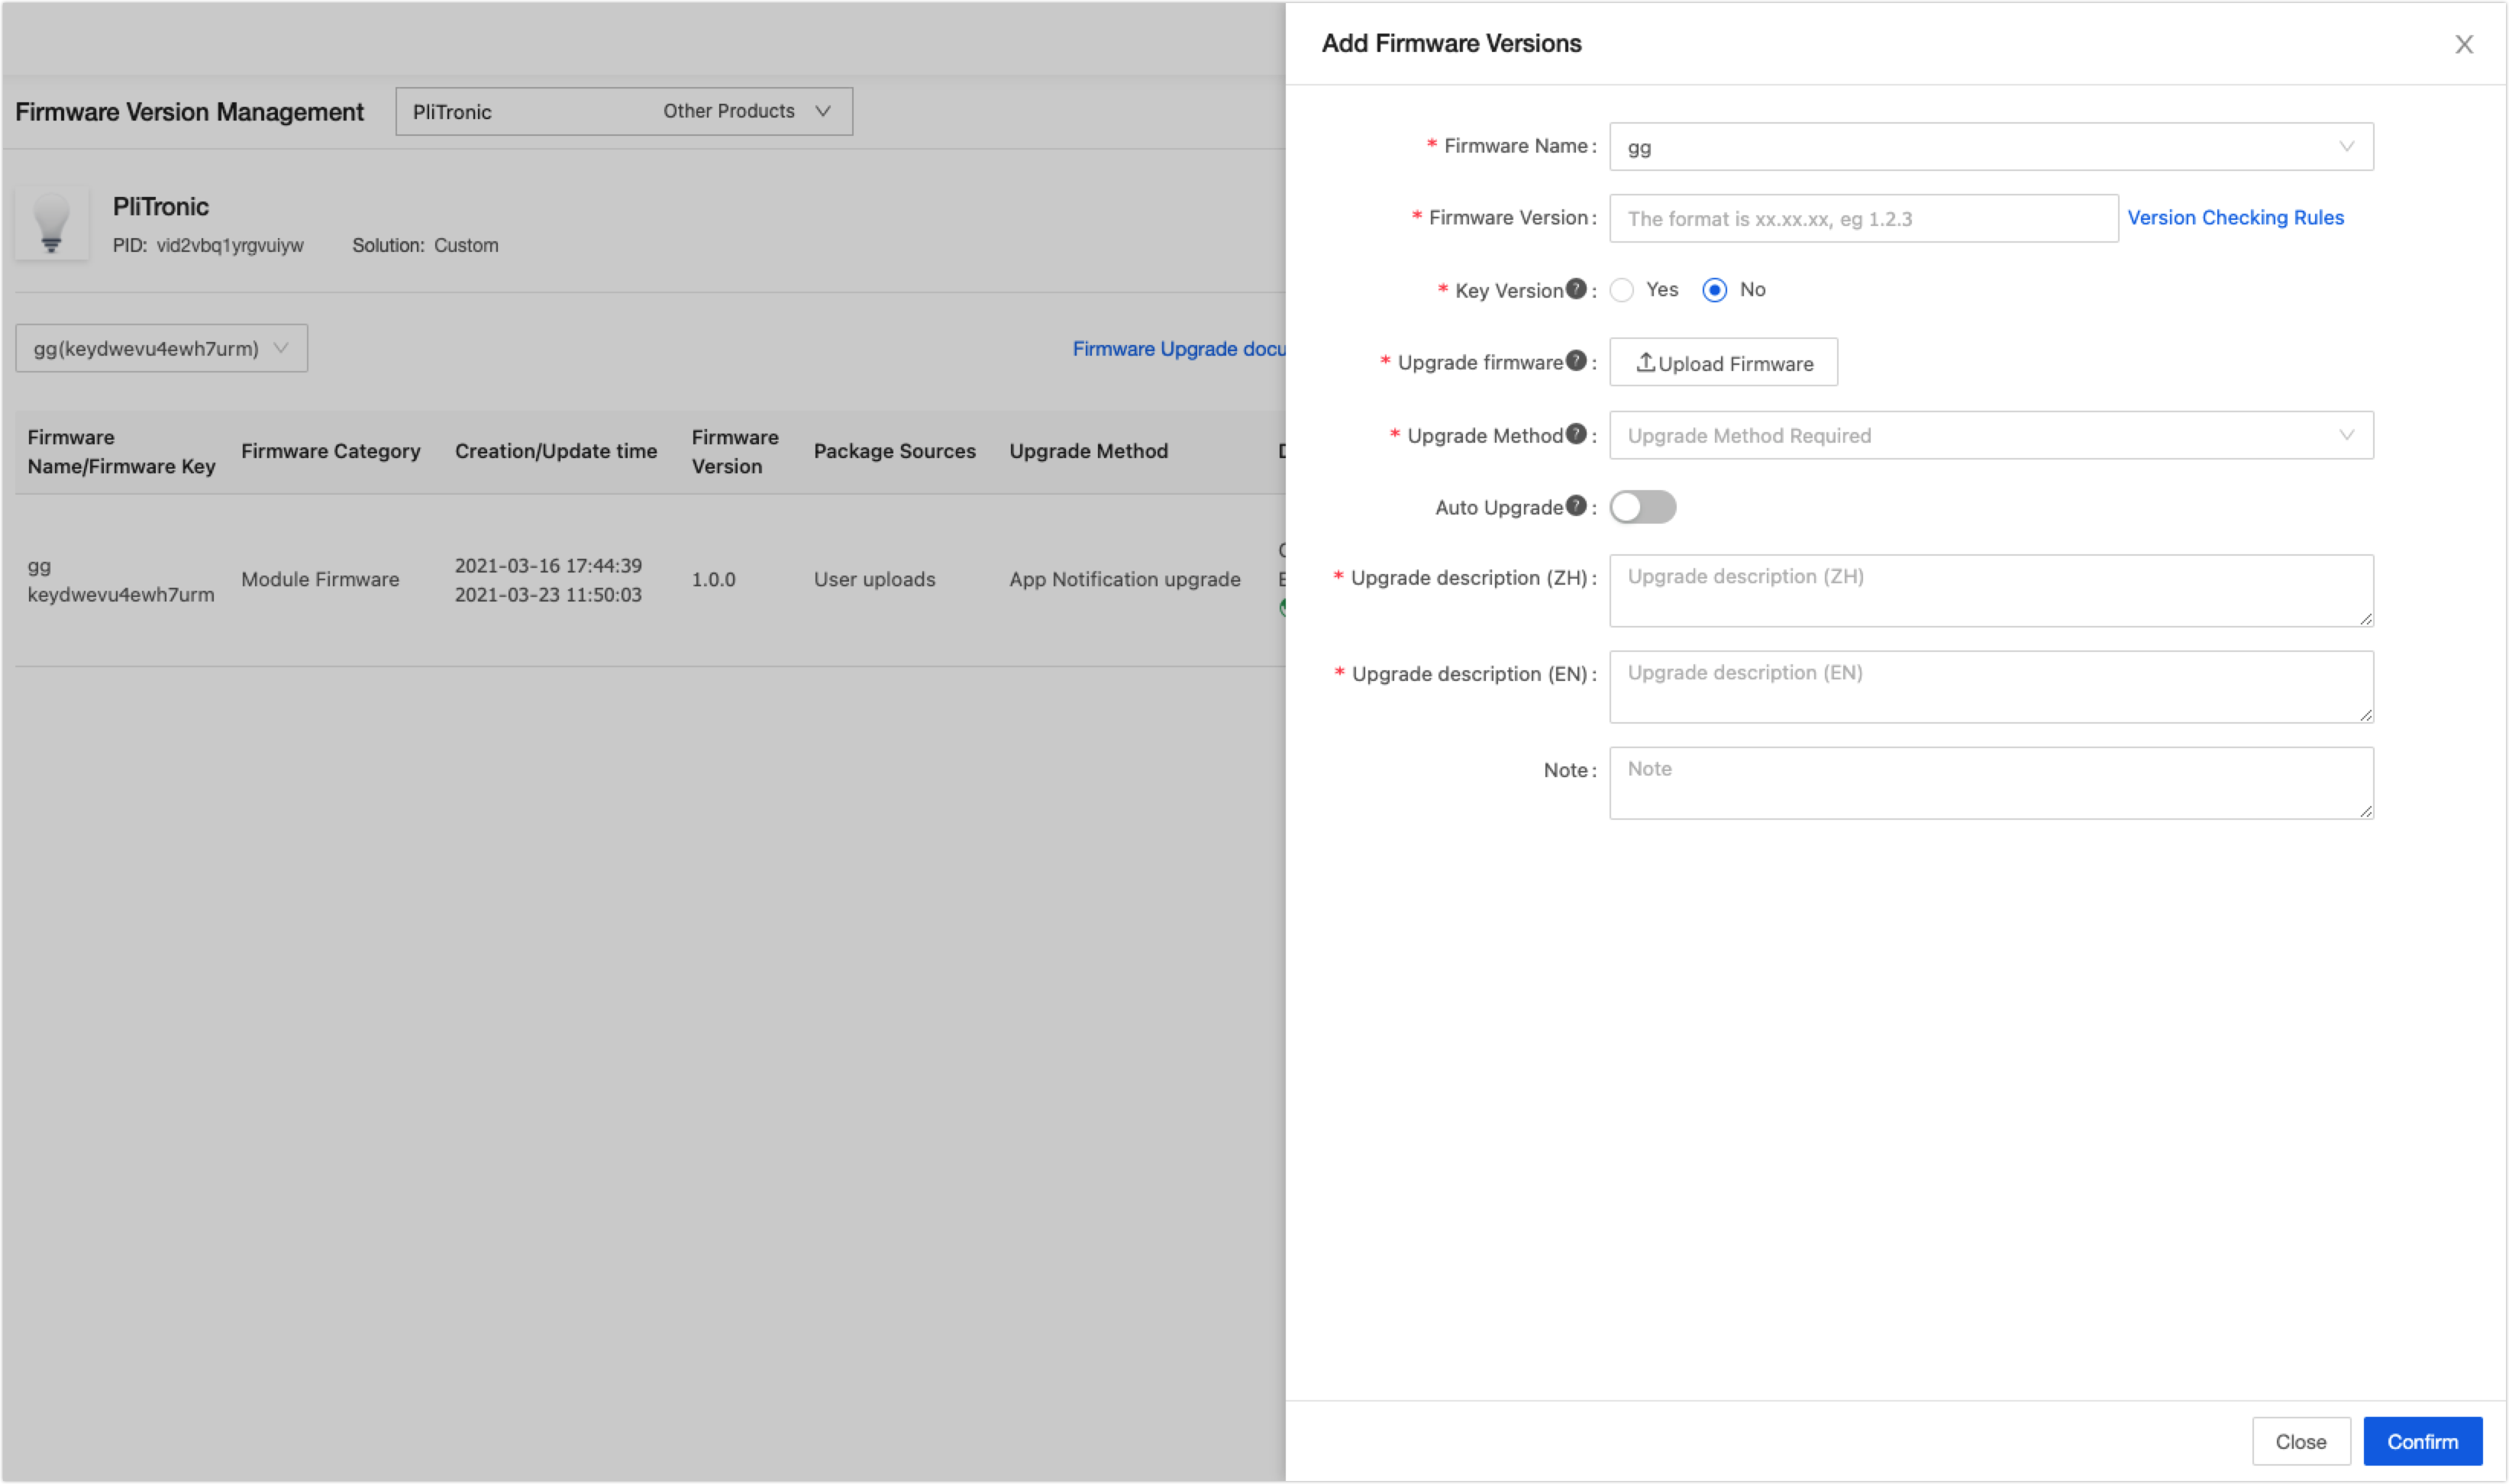
On the Firmware Version Management page, you can add or edit firmware versions, and verify the firmware availability.
-
Click Add Firmware Versions.
Description:
- Only the firmware uploaded by yourself supports the new version.
- Tuya’s firmware only supports adding test devices to verify and update.

-
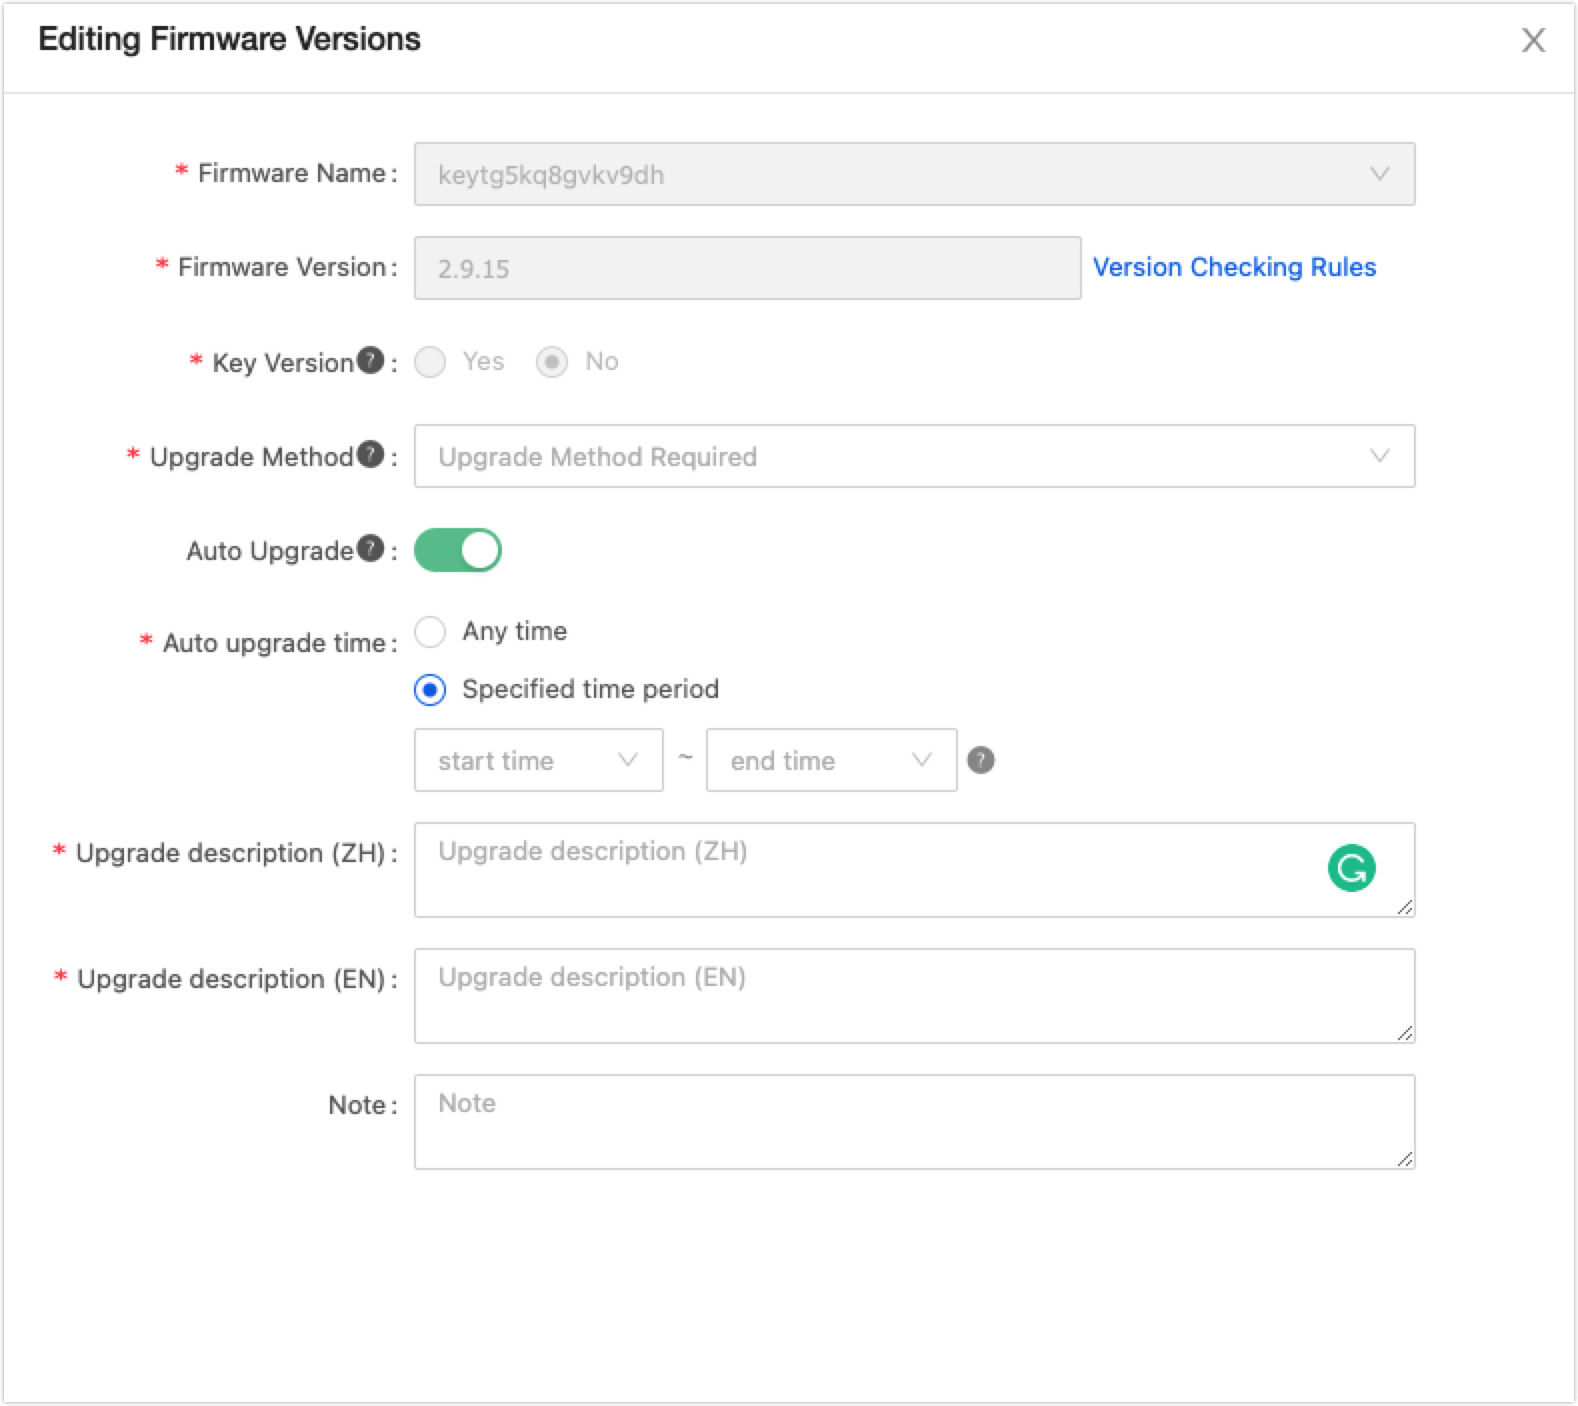
Enter the firmware parameters and click Confirm.
The firmware version cannot be modified once it is added. 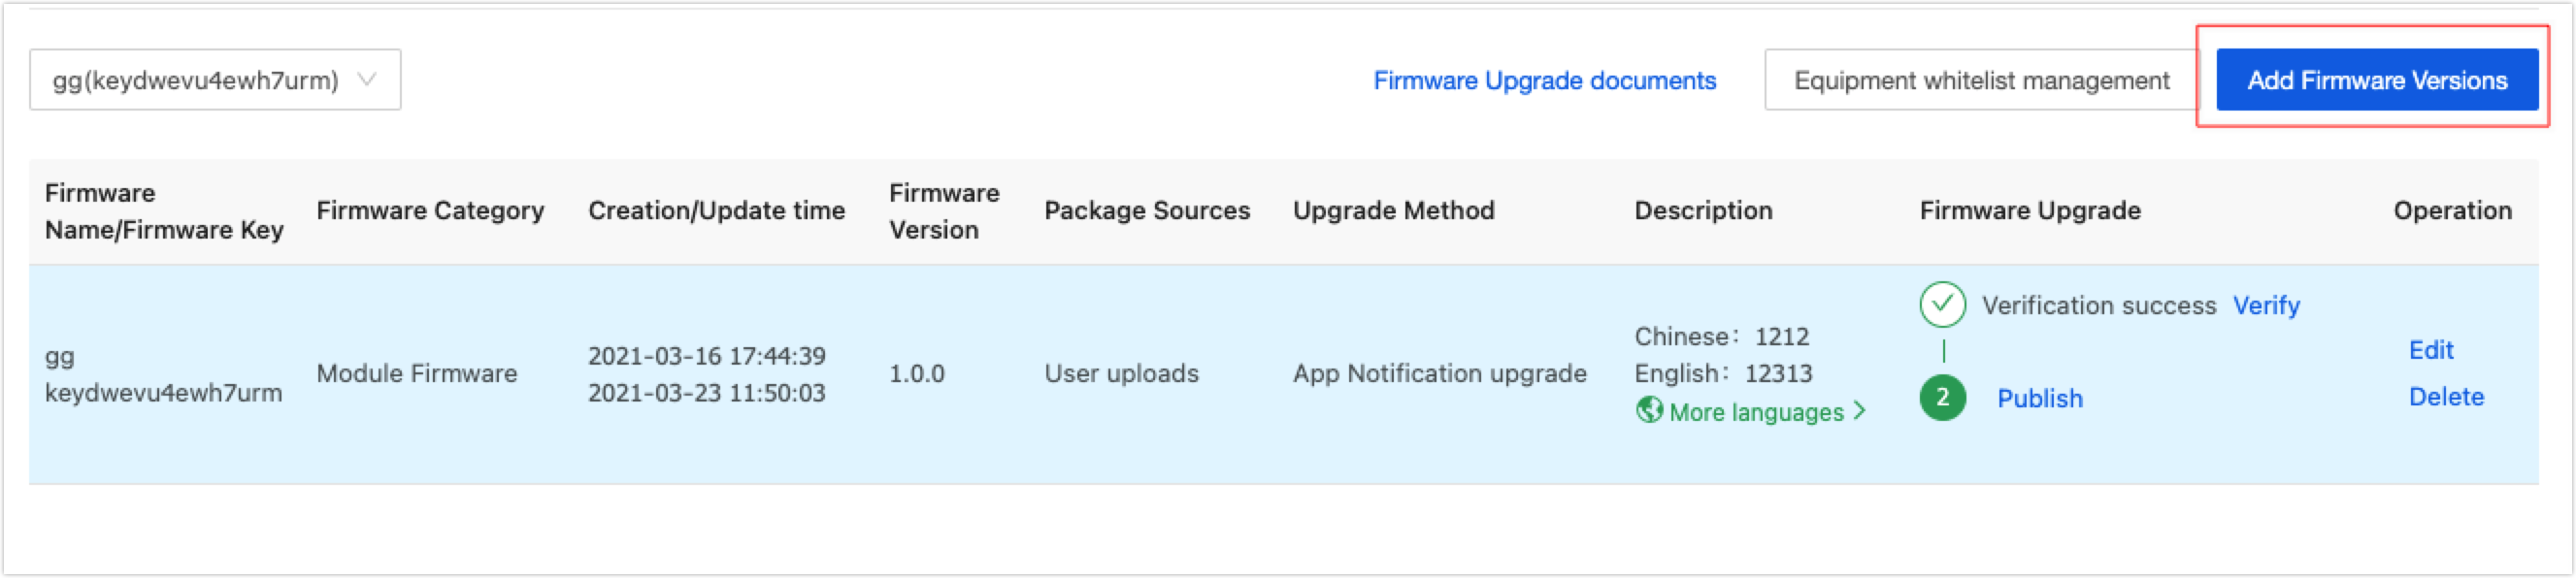
Glossary
| Item |
Description |
| Tuya standard chip |
It is the identifier of a chip. The chip that has been used by Tuya. It can be flashed with the firmware by using the Tuya host and the Tuya host program. |
| Channel number |
For firmware updates only. When a product has multiple firmware to update, the Tuya Cloud and Tuya devices will use the upgrade channel number to distinguish different firmware for different update operations. |
| Gray release of firmware |
Gray release is a release method allowing the firmware version to gradually transit to a new firmware version. When the new firmware is developed and the update is about to be released, You can perform an A/B test. Namely, some users continue to use the old version A, and some users start to use the new version B. If the users have no objections against version B, and version B has no bugs, you can gradually extend the scope and migrate all firmware to version B. |